Docs |

1. Short Introduction
jsapp.cloud is the efficient solution for web applications based on CLOUD resources .
A collection of web services, tools, and web interfaces that creates the foundation for the fast development of modern, secure applications.
It offers an optimized backend and a lightweight client to build highly scalable web applications. It is secure and adheres to current standards for web development.
There are two options to use the JSAPP.CLOUD solution:
(I) - use your own Amazon AWS account for a private CLOUD infrastructure, that offers a complete control to your data and account configurationn, available now;
(II) - use the JSAPP.CLOUD infrastructure, your data is managed by JSAPP, available soon!
The backend is based on RESTful web services and implements all the required services for your web app, offering support to add new APIs as required by your system integration.
The solution is tailored around Amazon AWS CLOUD services to provide one of the best environments for web apps.
(I) JSAPP.CLOUD does not host your developed application by default;
you will need to install the required resources in an Amazon AWS account, being in total control of your data privacy and services management.
Powered by Node.js, the backend services covers:
- authorization, based on JWT
- CLOUD file access, based on S3 and data stream encryption
- database access APIs for PostgreSQL
- application APIs
- web server
- management interfaces
Proposed web client interfaces are based on HTML5, Bootstrap and Vue.js.
The client application is hosted by the application web server and stored in encrypted CLOUD files by default.
Development is CLOUD based, the client interfaces is carefully designed to offer on demand resources loading
being used for very big web apps or small ones alike.
The system is secured and can be used to develop applications for sensitive databases.
Users, groups and access right are managed based on high security standards.
You can develop fast and faster web applications whether are small or large. Most of the backend and frontend is covered; all you need to do is to implement your app interfaces and business logic.
On demand resource loading:
Helps the application to start faster by loading only the initial files. All required routes and components will be loaded quickly upon request.
This model helps you :
- to build huge applications with practically unlimited number of routes
- continue development model, some parts of your live app can be under development or modified while the app is used in production
High scalability:
Horizontal scaling using small EC2 application-server instances in parallel and load balancing provides a more reliable and cost-effective solution.
The web server resources (HTML, CSS, JS, the web app ) are stored in the S3 file system, offering a single source similar to a custom CDN.
The cloud IDE assists with secure multi-developer access. The application development model does not require 'build' or server resource uploads to be updated.
Applications for the enterprise:
A virtually unlimited number of users; the application can scale for very large companies. Support for large applications and access rights based on user groups and app roles is available.
Built-in security against different attack types. Encrypted S3 file storage, encryption / decryption of data streams for high efficiency , and a DRIVE app module with folder-sharing options.
A lower development budget offers support for international applications and documentation. It respects EU GDPR legislation for personal data storage and access.
1.1. About
The presented solution development started in 2014 with some of the web services and continued over the
years
with new parts or features required for different custom designed applications.
It is used in productions for ERP, CRM and custom web apps for many years.
Part of it's services and tools are based on webdo.com solutions,
adapted for enterprises.
The web client uses the production latest versions for CSS, framework and utilities.
The jsapp.cloud is created and supported by Q-bis Consult SRL
You may ask your questions here.
1.2. Concept
We want to maximize the benefits of using and developing software while keeping budgets under control.
The solution we present is mainly related to resource allocation; the one metric that is easiest to consider is time ,
and the second is unit cost. Of course, completing something in a short time does not guarantee all the time the quality of the result;
this should be addressed by using better tools.
One software development solution should be able to:
- Scale easily from a few users to hundreds and more.
- Offer security by default.
- Provide development benefits.
- Offer easy-to-use interfaces.
- Have low maintenance costs.
Balancing demands to resolve them as quickly as possible within a budget.
Development:
Carefully choose tools that lower the required time for development while offering the necessary flexibility.
Keep your programmers focused on the application's business aspects and user experience. Drop repeated, lengthy tasks.
Resource Consumption:
Balance requests using parallel scalability solutions and adjust the power of backend systems by leveraging unused power from client devices .
Maintenance:
Use cloud resources that are more reliable and typically offer management; maintain a clear and well-documented source code and utilize debugging options initially.
The proposed solution includes almost everything you need to implement, configure, develop and run a scalable web application:
- Backend services and cloud implementation solutions and scenarios.
- Default security and secured access rights.
- Solutions for frontend application development.
- Pre-made application modules that are necessary everywhere.
1.3. System Architecture
Web Clients ( notebook, tablet, smartphone 7-1,000,000) |
|||||
|
The Internet Network |
ThirdParty API; AI; etc |
||||
Firewall |
|||||
Load balancers |
|||||
1. API services |
2. API services |
3. API services |
... | N. API services |
|
| CLOUD Resources /S3, Route, SES, ML ... |
Database server /cluster |
||||
We use the Amazon AWS for CLOUD and infrastructure solutions.
Basic CLOUD services:
- S3 - file storage
- RDS / Aurora / PostgreSQL database
- Route53 - domain management
- SES ( app mail delivery )
Any other CLOUD service required for application business model can be added as a service, same for integration with third party services or APIs.
Infrastructure resources:
- VPC
- load balancing
- security
- and/or fixed IPs
RESTful API webservices
Standard VPC:
- Linux Ubuntu
- Node.js/services apps
- tools
1.4. Horizontal Scalability
Scalability is the measure of a system’s ability to increase or decrease in performance and cost in response to changes in application
and system processing demands. Examples would include how well a hardware system performs when the number of users is increased,
how well a database withstands growing numbers of queries, or how well an operating system performs on different classes of hardware.
Enterprises that are growing rapidly should pay special attention to scalability when evaluating hardware and software.
According to gartner.com
There are two models to offer scalability: one that has obvious flaws, referring to vertical scalability , and the true solution, which is horizontal scalability.
We will discuss horizontal scalability and how it will be implemented.
Horizontal scalability requires parallel processing or the possibility to alter the number of available services resources at one moment depending on the expected number of requests. In our case, it refers to the number of EC2 instances used for the application services. In order to use horizontal scalability, you will need to use a sessionless connection between the client and services. Each request is treated separately and may be resolved by different service servers in a transparent manner.
The RESTful services we are using require authorization for each request; a JWT token is used and fits perfectly in the horizontal scalability model. The second part, which requires updating the number of allocated resources on demand, is solved gracefully by the AWS infrastructure in place.
We are using cloud resources wherever they fit the application's functionalities. Cloud resources are the best because scalability is inherent.
1.5. Security
JSAPP.CLOUD applies security controls at several layers. Communication between clients and services is protected by HTTPS/TLS. AWS security groups, firewalls, IAM policies, and application access rules restrict access to infrastructure and application resources.
Protected services follow zero-trust principles: every request must be authenticated and authorized independently. The services do not rely on an earlier browser session as proof of access. A valid JWT is required for protected requests, and the backend verifies the token and the user's applicable roles and access rights.
Application permissions can cover modules, routes, registered SQL queries, database tables, file operations, and custom API operations. Hiding a frontend menu is a usability feature, not a security boundary. The backend must reject every unauthorized request.
Files are stored in a private S3 bucket and can be protected by application-level stream encryption as well as AWS S3 server-side encryption. File access requires authorization and is limited by the platform's user, group, folder, and application rules.
Horizontal scaling can improve availability during increased traffic, but it is not a complete DDoS defense. Production systems should use appropriate AWS protections, rate limiting, load-balancer controls, monitoring, and incident-response procedures.
The platform provides encryption, authorization, access-control, audit, and deployment features that can support a GDPR-compliant implementation. Compliance also depends on the selected configurationn, legal basis, data minimization, retention policies, key management, operating procedures, and the responsibilities of the data controller and processor.
The platform can be configured for applications that process sensitive business, financial, medical, or personal information. Such use requires an appropriate security design, access configurationn, monitoring, backups, key management, contractual controls, and compliance review.
2. Getting started
JSAPP.CLOUD offers the building blocks for web application implementation; it does not host the implementation. To give you full control over your data and the infrastructure used, the implementation utilizes resources from your own Amazon AWS account. We can provide basic support and assistance when needed. Upon request, we can offer additional support based on an agreement.
The presented solution is best for multiuser database appliations. You can build a system that can scale easily based on CLOUD resources and managed database clusters.
WEB applications built with JSAPP.CLOUD are ERPs , CRMs , Medical Registries, and custom WEB Apps to date , ranging from 20 to thousands of users and more.
Initial settings for the AWS account and installation are documented in next 2.x pages.
However the AWS marketplace installation offers a Cloud Formation Template that create the required IAM role automatically.
Open the Marketplace in your AWS account, discover the JSAPP.CLOUD page and proceed with the Marketplace steps to install the JSAPP.CLOUD on your account.
There are different releases, chose one according with your needs.
- CE ( Community Edition ), status: available now
- CE SMB ( CE Small Business ), status: to be published in November 26
- Pro ( Professional ), status: to be published in March 27.
- Enterprise, status: to be published at a latter date, check again for details.
Please check the JSAPP.CLOUD website for releases differences.
Save a lot from your development budgeted time.
You will have from the start:
- Backend
- an users management system based on role access configurationn;
- a SQL API interface, offers CRUD database access following the system security in place ( for PostgreSQL/ AWS Aurora );
- a scalable WEB and application server that uses S3 objects for file storage;
- CLOUD managed encrypted file storage based on S3 objects;
- Frontend
- a WEB client that is responsive;
- loading on demand ( lazy loading ), your application will load fast nomatter how big it is;
- internationalization ( using an AI tool, a new language/translation can be added in less than a minute );
- contextual help system;
- a powerfull BI and reporting module;
- a file management module;
- an user management module;
- system access configurationn ( role based access ) module;
- a CLOUD IDE for your application embedded into the file management module
The WEB Client structure is optimised for WEB applications, it is based on application modules and offer a clear structure to build your application on.
Combined with the CLOUD IDE, the development time for your application is reduced several times:
The implemented system requires cloud resources and services, as well as infrastructure.
At this moment, one of the best providers for CLOUD resources is Amazon AWS.
Amazon AWS offers all required infrastructure resources to build a highly scalable and secure web application solution, S3 object storage, EC2 instances and VPC networking, firewalls security filters, load balancers and managed SQL databases.
In addition, AWS offers a lot of services that may be integrated into your software application as well.
The configurationn of the system takes some time; as some necessary steps may be delayed (like registering an AWS account, domain name acquisition, and others alike).
Initial settings for the AWS account and installation are documented in next 2.x pages.
However the AWS marketplace installation offers a Cloud Formation Template that create the required IAM role automatically.
Open the Marketplace in your AWS account, discover the JSAPP.CLOUD page and proceed with the Marketplace steps to install the JSAPP.CLOUD on your account.
2.1 Requirements and recommendation
An Amazon AWS account is required. The account should be in the name of the final user (client).
Navigate to https://aws.amazon.com/ and press the “Create an AWS Account” button.
Next, follow the AWS website's requests. The requestd email address can be provided by the client.
A credit card is required to validate the account.
A domain name is necessary for the software solution's web services address.
You can use a domain name that you already have or purchase a new one.
We recommend buying a new domain name from Amazon AWS using the Route 53 AWS service page with the created account.
It will be useful to have all resources with one provider. AWS Route 53 offers also facilities for DNS routes to registered load balacers as A records (not IP only), with other DNS providers you will need to use CNAME instead.
If you use an existing domain name, check if you have access to edit DNS records for that domain (directly or through a third party).
Follow next steps to add the required resources.
2.2 The AWS S3 Bucket
An AWS S3 bucket is a file storage location.
It should be created before implementation starts since it is needed into the system configurationn.
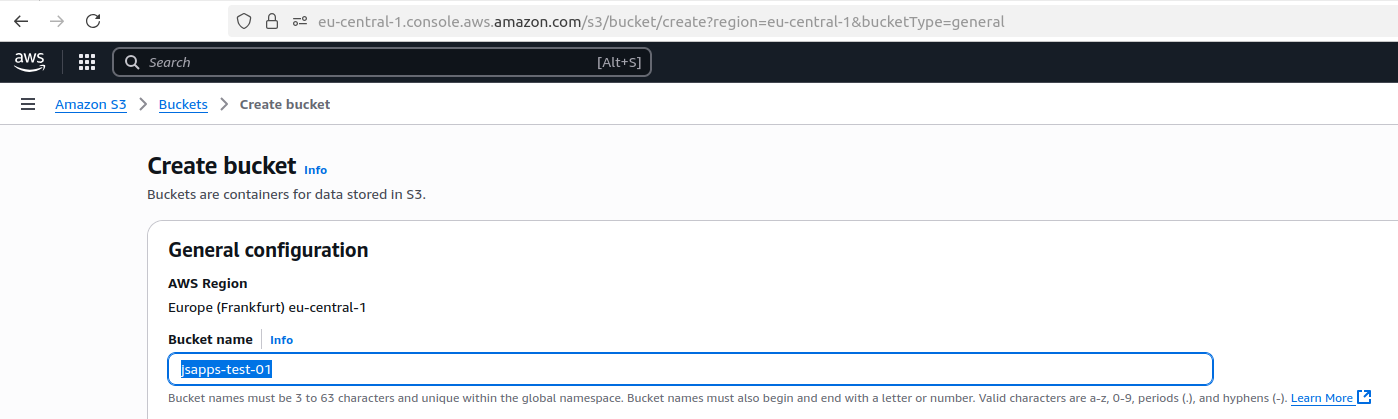
Create a new bucket; the software solution will create related file structures in the bucket.
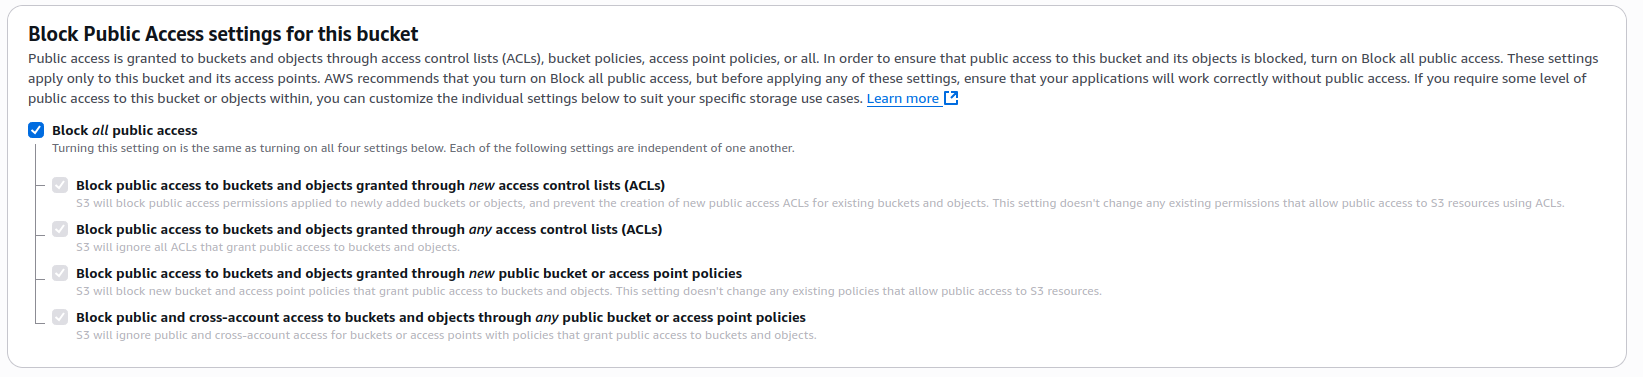
It should be a default NOT public S3 Bucket. See next pictures for more information.
Open your AWS account page, search for the S3 Services:
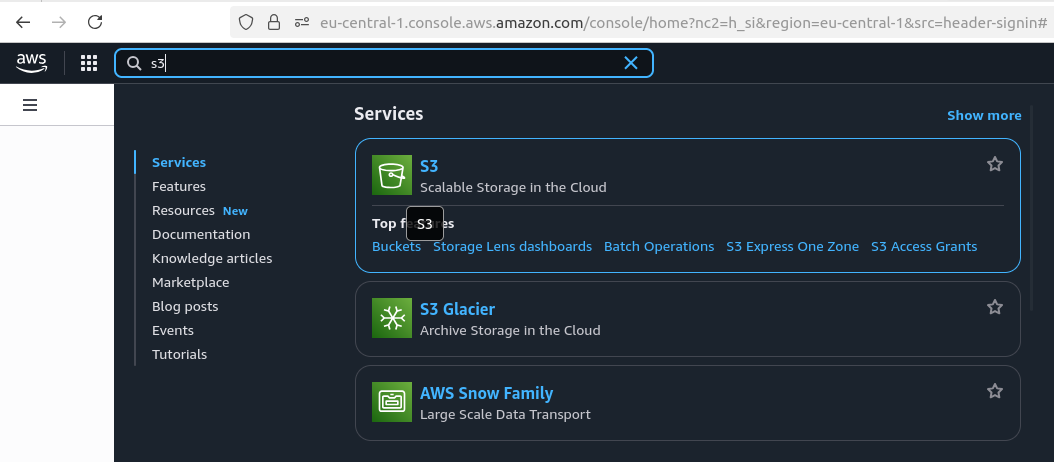
Create a new Bucket into the AWS S3 page, set it's name according with your preferences, however it should be unique.
Block all public access:
The S3 Bucket should be used only by the new application.
You can create as many buckets as you need for other purposes, AWS will charge per monthly stored GB and file transfers.
AWS S3 will provide encryption at rest, it is by default from few years now, the file service we use will add a new encryption layer on top of that.

Choose the S3 versioning policy according to recovery, retention, compatibility, and cost requirements. Enabling versioning can improve recovery from accidental or destructive operations. Configure lifecycle rules to manage older versions

Press "Create bucket" button.
The new bucket will be created and available immediately in the buckets list.
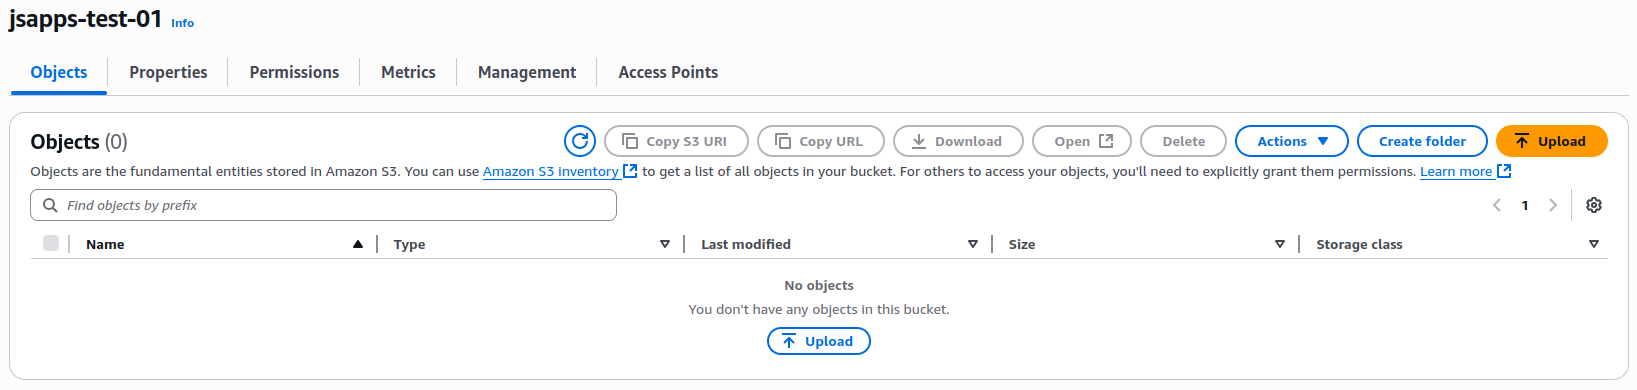
Use the Amazon AWS S3 service page to manage the bucket. DO NOT set public access for the new bucket.
2.2.1. AWS S3 bucket encryption
JSAPP.CLOUD uses the configured private AWS S3 bucket for file and application-resource storage.
In the current release, the application service applies AES-256-CTR encryption to file streams before the resulting ciphertext is stored in S3. During download, the authorized application service retrieves and decrypts the stream before sending it to the client over HTTPS.
The protection flow is:
- Browser to application service: protected by HTTPS/TLS.
- Application upload stream: encrypted by the JSAPP.CLOUD service using AES-256-CTR.
- S3 object: stored as application-encrypted ciphertext.
- Optional additional layer: AWS S3 server-side encryption, according to the bucket configurationn.
- Download: retrieved and decrypted by the authorized service, then transferred to the browser over HTTPS.
The future storage format should be versioned so that existing AES-256-CTR objects remain readable during migration. New objects can use the authenticated format while older objects are migrated through a controlled background process or when they are rewritten.
The encryption passphrase or key material is configured during installation and must be backed up in a secure location. It must never be placed in frontend source code, public configurationn, S3 object metadata, or application logs.
Before final publication, document separately:
- the installation passport and its recovery policy;
- the file-encryption key or passphrase;
- the JWT signing key;
- how additional EC2 instances obtain the shared protected configurationn.
Do not use the terms passport, passphrase, passkey, and signing key interchangeably unless they refer to the same value in the installed release.
2.3 Access role (IAM) - AWS
AWS Identity and Access Management (IAM) is a web service that helps you securely control access to AWS resources.
We are using'it in order to give access to used EC2 Instances to the S3 bucket.
The AWS marketplace installation offers a ClouD Formation Template that create the required IAM role automatically.
The EC2 instances' software (the web services) requires access to the created S3 bucket. To grant access , an IAM role is required.
Use an EC2 IAM role restricted to the required S3 bucket and only the required S3 actions. Avoid account-wide S3 access unless a separately reviewed integration requires it.
Create an IAM role based on the S3 access policy.
The recommended option is to create an IAM policy that sets access to the created S3 bucket only.
Next, create an IAM role based on the newly created policy.
By doing this, the installation can not interfere with any solutions currently in place or will be implemented later.
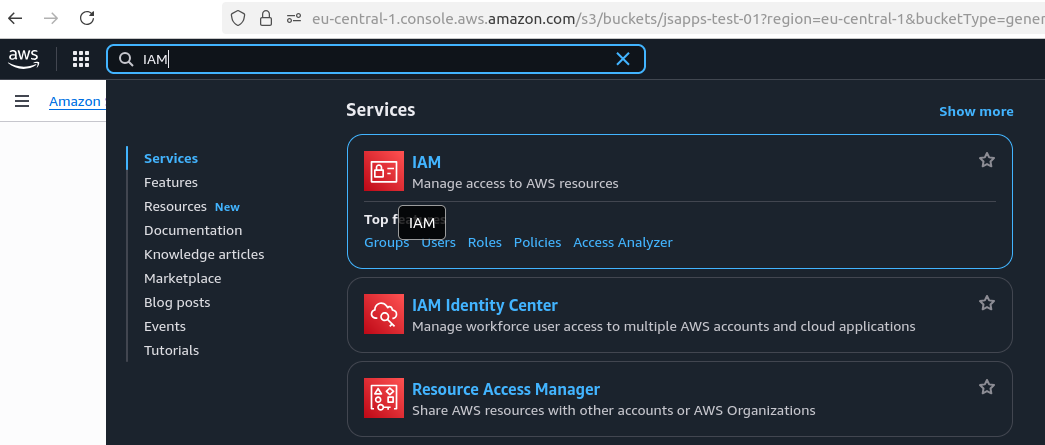
Search for IAM into your AWS account page:
1. Find the "Policies" menu ( left side, under "Access Management" menu ), and open the Policies List.
Press "Create Policy", right side button.
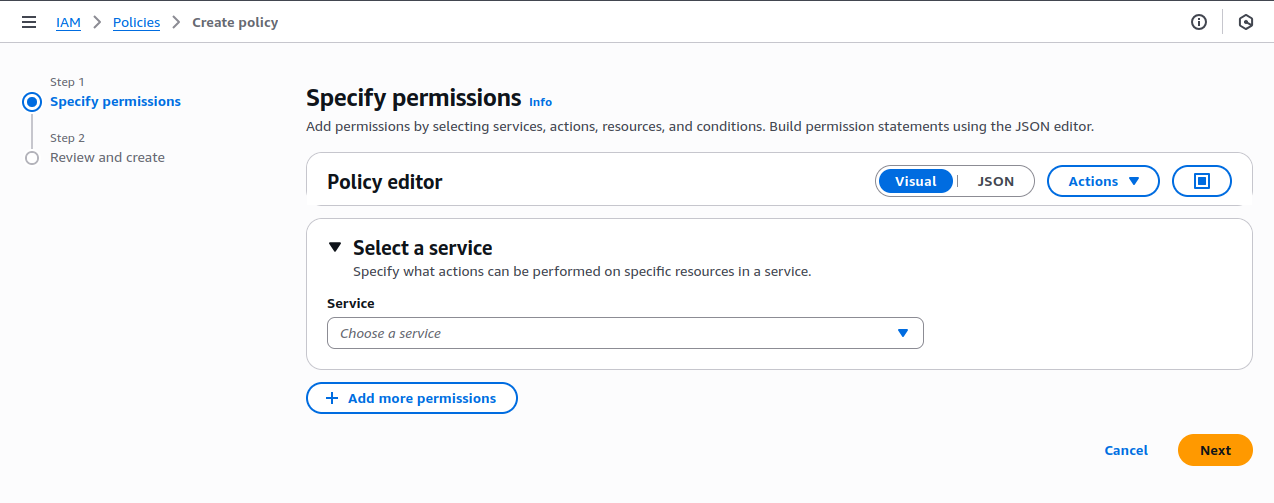
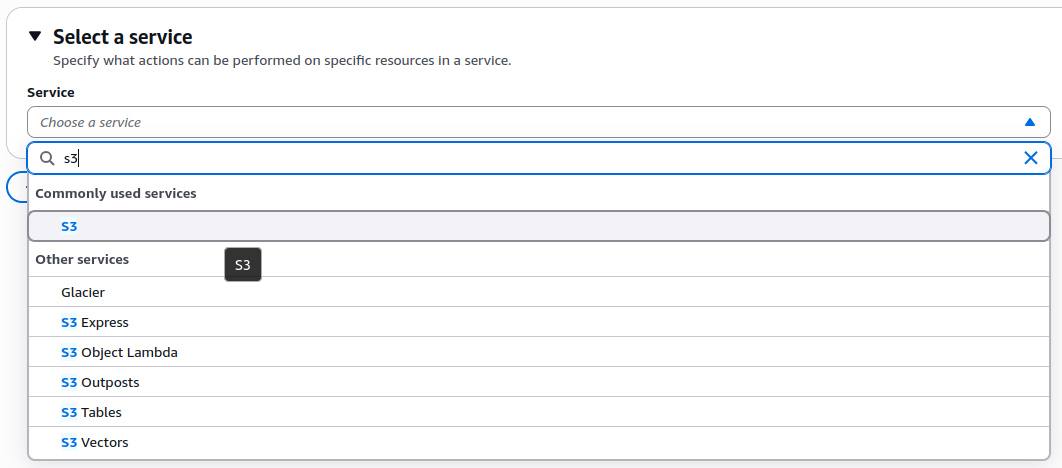
2. Set S3 into the "Service".
3. Permissions for the S3 service.
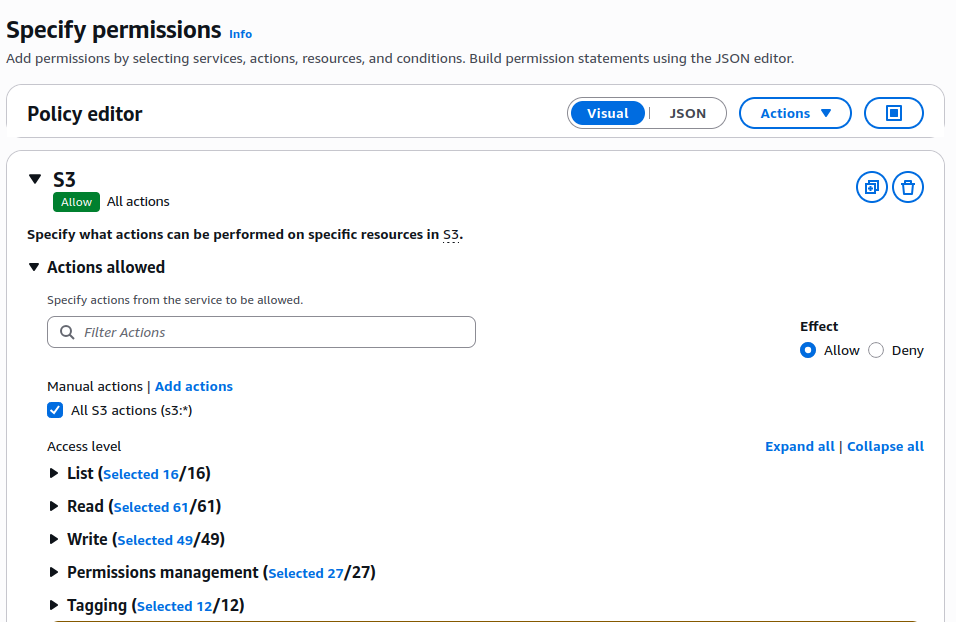
Resources:
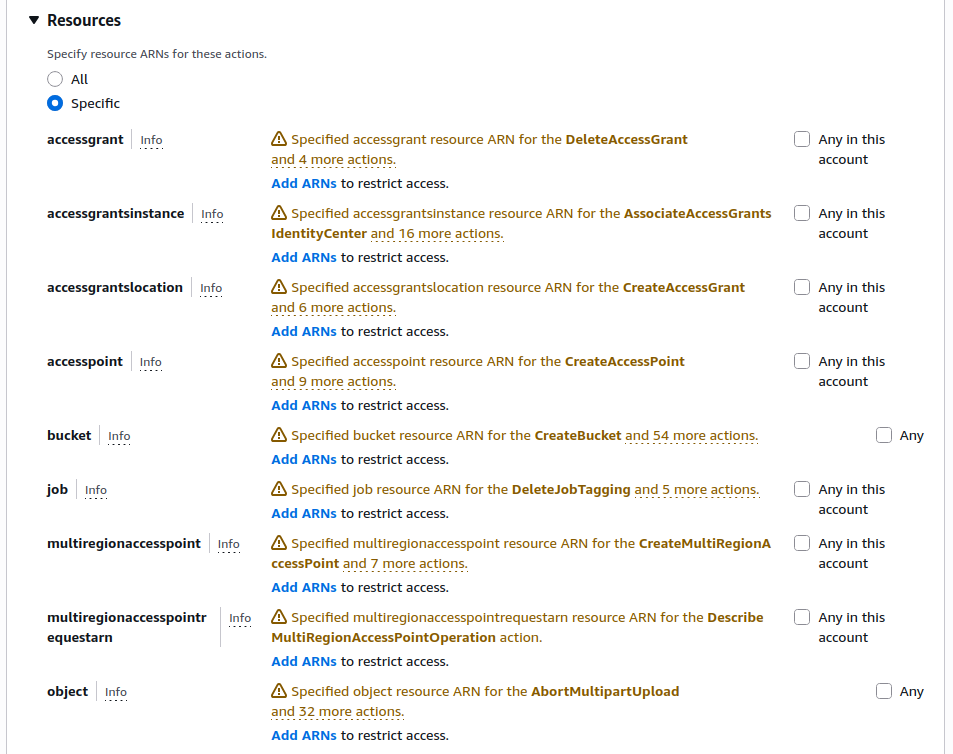
You will need to set access resources to Bucket and Object.
Bucket resources settings:

Press "Add ARNs", and set your created bucket name here.
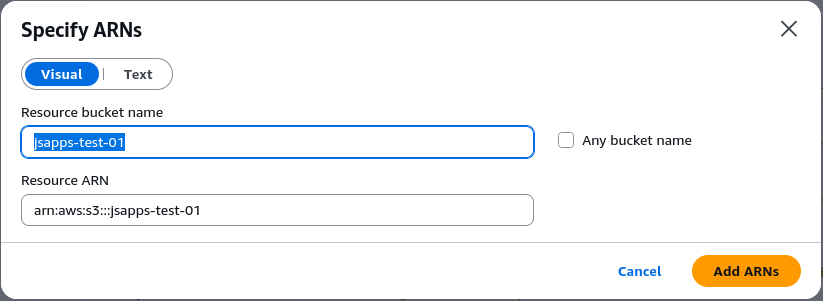
Object resources settings:
For S3 objects are stored files, the S3 can be seen as a key document NoSQL database of objects.
You will need to set the access rights for the objects into the S3 bucket.
For object resources, limit the policy to objects below the selected bucket ARN, for example arn:aws:s3:::<bucket-name>/*. Do not grant access to objects in unrelated buckets.

Press "Next" :
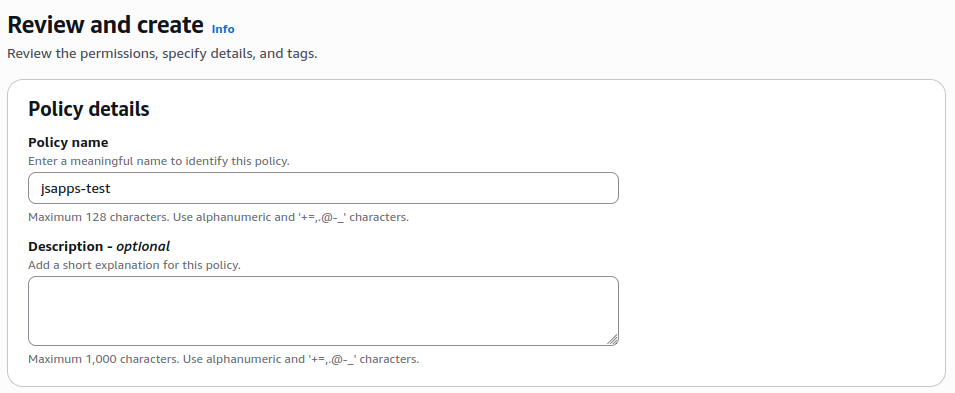
Set a name for your new policy and press "Create Policy".

4. Roles are used to give access to resources set by policies.
You will need to add the new role to your EC2 VPC's later in order to allow access to the S3 bucket.
Find the "Roles" menu ( left side, under "Access Management" menu ), and open the Roles List.
Press "Create Role", right side button.
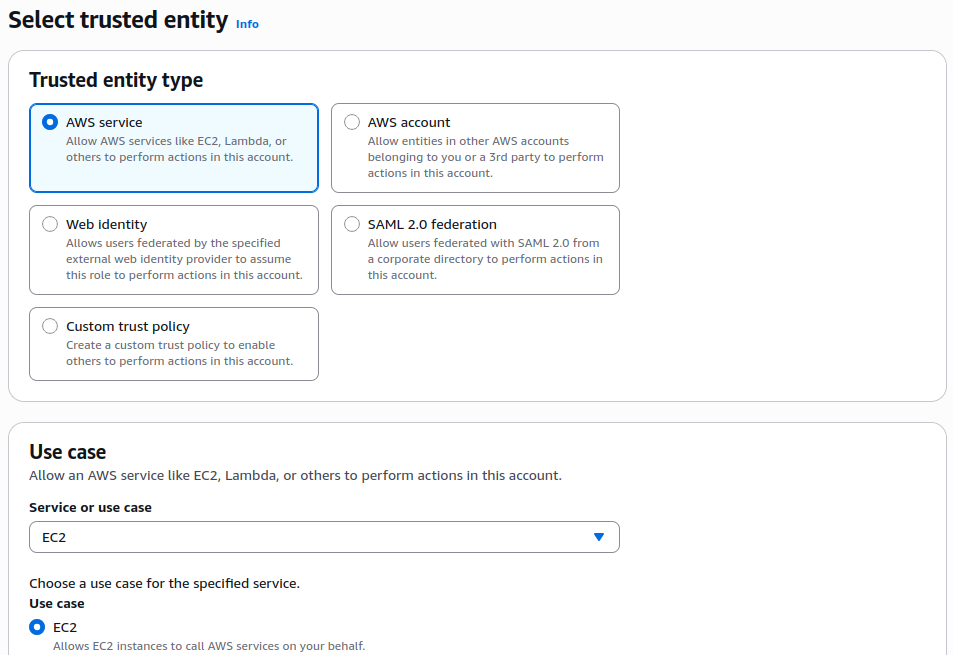
Select EC2 for the service and press "Next".
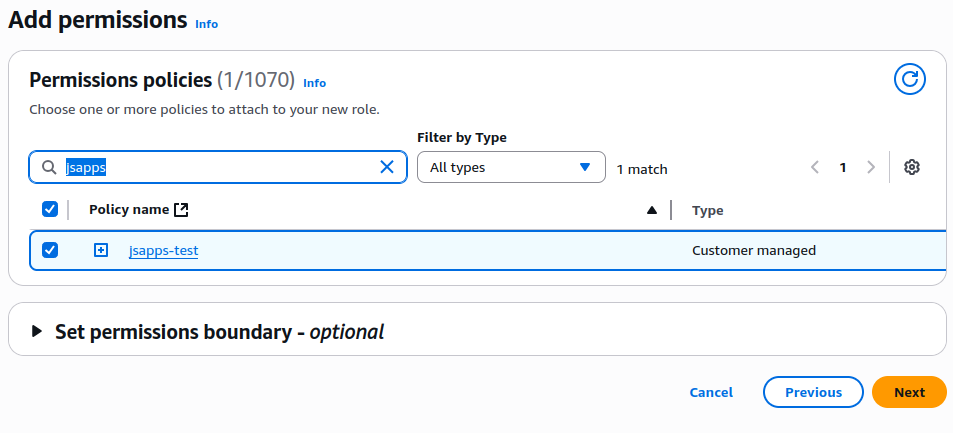
Search for your new created policy, select it and press "Next".
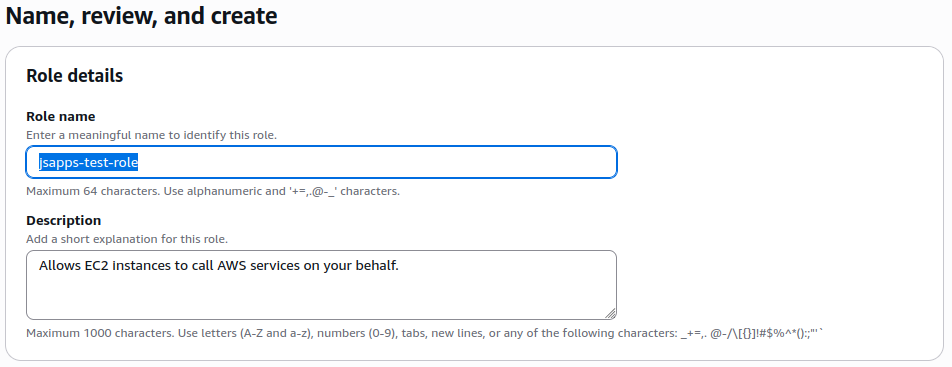
Set your role name and press "Create role".

The new role is ready to be used.
2.4 Services Implementation
Install one EC2 instance from the Marketplace.
The JSAPP marketplace AMI instances are preinstalled with required software.
There are two AMI types, the Community Edition (CE) and PRO edition.
Chose the CE edition to use the demo project for learning, for development or for small projects.
Chose the PRO edition for production ready services or development, it can be used for development and in production.
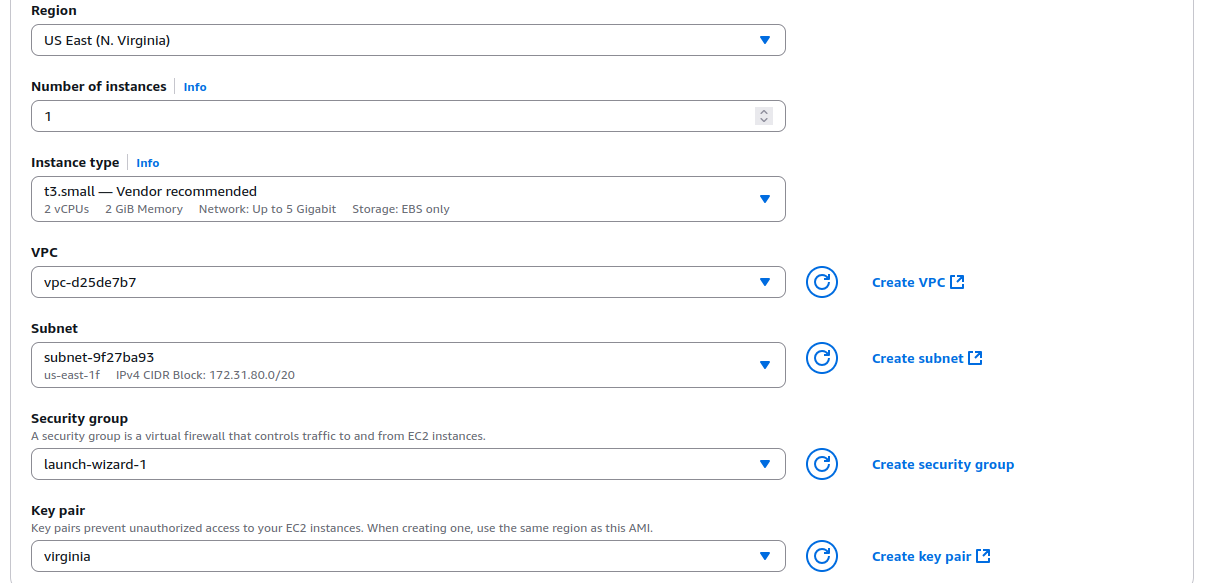
Start an EC2 instance using an AMI from the Marketplace. Search for the "jsapp.cloud" AMI and choose the release.
Set the instance type from available list.
It can be changed later, but considering the estimated system usage at the start, you can choose from different instance types.
We recommend a T3a-micro for one hundred users with low access, a T3a-small for one hundred users with normal access, and a T3a-medium for more users or higher access levels,
scaling allocated resources as the user base grows. These values are initial examples, not capacity guarantees. Actual requirements depend on concurrency, request frequency, response size, reporting, file transfers, and integrations. Monitor CPU, memory, network use, latency, and errors, then resize or scale based on measured load.
The system is scalable; more instances can operate in parallel to increase service availability.
The Limited Edition have a local PostgreSQL database server installed, it can not be used in parallel and it is limited in resources ( only five active users ).
Since it has a database installed you will need a t3-small instance at least.
Save and keep the created PEM access key secured at all times, as it is the only way to connect to your instance later for direct console management (SSH).
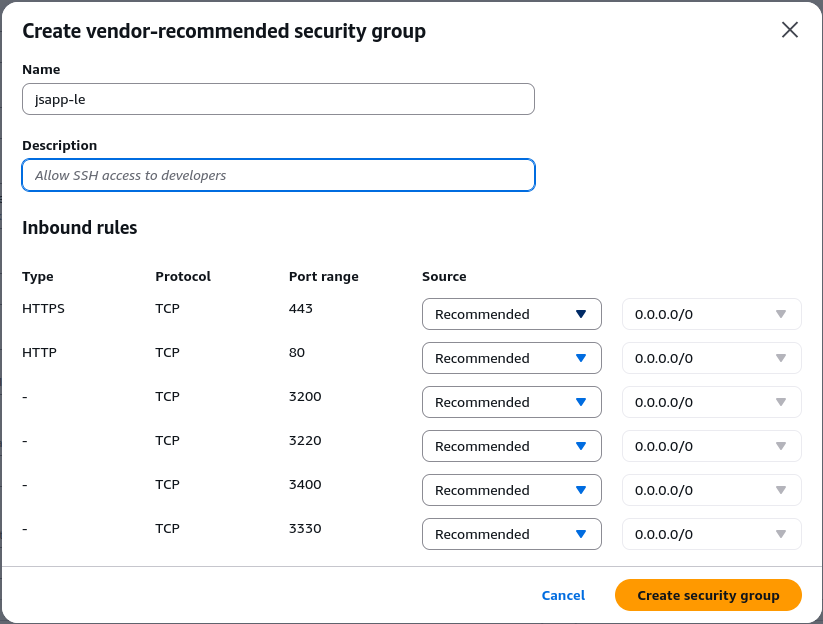
Click on "Create Security Group" to set the default security settings required by JSAPP service.
Set the security group name and description an press "Create Security Group" next.
The EC2 instance can not interact with your other resources into your AWS account by default.
Once the EC2 instance is up and running: - use the AWS EC2 page to allocate the IAM role to the new instance.
This will grant access to the S3 bucket for the new instance. - check the security group of the new instance.
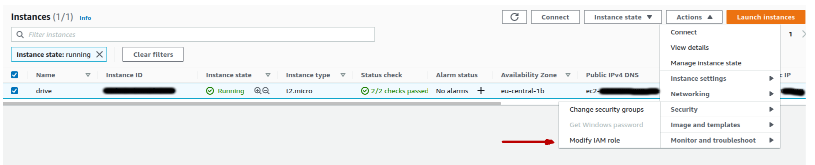
Add you IAM role ( set previously ).
In order to allow access to the S3 Bucket you will need to add the role to this instance.
You will need to check the security group next.
2.5. Security groups
Configure security groups from the AWS EC2 console. Apply the principle of least privilege and expose only the services that must be reached from each network location.
| Port | Purpose | Recommended access |
|---|---|---|
| 80 | HTTP redirect to HTTPS | Public only when the redirect service is required. |
| 443 | Main application and public application APIs | Public, normally through the intended load balancer or reverse proxy. |
| 3200 | Application settings | Trusted administrator IPs, VPN, private network, or another controlled management channel. |
| 3220 | Authorization management | Restrict according to its actual use. Management interfaces should not be generally public. |
| 3330 | PostgreSQL RAPID API | Expose only through the intended application architecture, trusted origins, proxy, or load balancer. |
| 3400 | RAPID administration | Trusted administrator IPs, VPN, or private network. |
| 22 | SSH administration | A trusted administrator IP, VPN, or managed access service from the initial launch. |
| 5432 | Standard PostgreSQL port | Application-server security groups and explicitly approved administrator locations only. |
Do not expose management interfaces or PostgreSQL to
0.0.0.0/0. When administration from a workstation
is required, allow only its current trusted public IP address
or use a VPN/private management network.
The exact ports are configurable and can be hidden behind a load balancer or reverse proxy. Verify the current installation before applying these examples.
2.6 Fixed IP
When you stop and start an EC2 instance, AWS will allocate an random Public IP address from it's pool.
On the other hand in order to set the DNS with the EC2 instance you will need a fixed IP address.
Add a fixed IP to the instance. For a simple installation (without an ELB balancer), a fixed IP is required.
If your DNS is hosted by AWS Route 53 and you are using ELB for service access balancing, a fixed IP is not necessary .
During the initial installation, for system configurationn and a quick start, you may begin with one instance, set the system to work, and add scalability later.
Use the AWS EC2 service page to add an EIP ( Elastic IP) address.
Allocate the created EIP to the EC2 instance. Afterward , press "Actions" and "Associate Elastic IP address" to link the fixed IP to your EC2 instance.
2.7 DNS Settings
DNS Settings
In order to find and use your newly created web services, DNS records should be created or modified.
DNS settings interfaces will vary for different providers.
The AWS Route 53 DNS manager will allow you to create an A record that maps to an AWS EC2 ELB address,
which is very handy. Amazon AWS sells domain names through the AWS Route 53 service web page.
We do recommend using AWS DNS management services and AWS Route 53.
You will need at least: an A record that points to the used IP address ( the EC2 Public IP) or a CNAME record that points to the ELB address.
Keep in mind that DNS settings propagation takes time. Your local system cache may store DNS requests, as well as the Internet ISP's infrastructure cache.
2.8 Application Settings
At this point , the application should be available via a web browser.
Navigate to your application settings interface:
https://<application-domain>:3200 ( e.g., https://{my-server}.{ext}:3200)
The interface will use a self - signed SSL certificate at first start.
You should allow access from your browser to the settings web page; it is acceptable for the moment and the first configurationn step.
Add a SSL certificate to your installation later.
The first time, you will set the instance server and the system access settings:
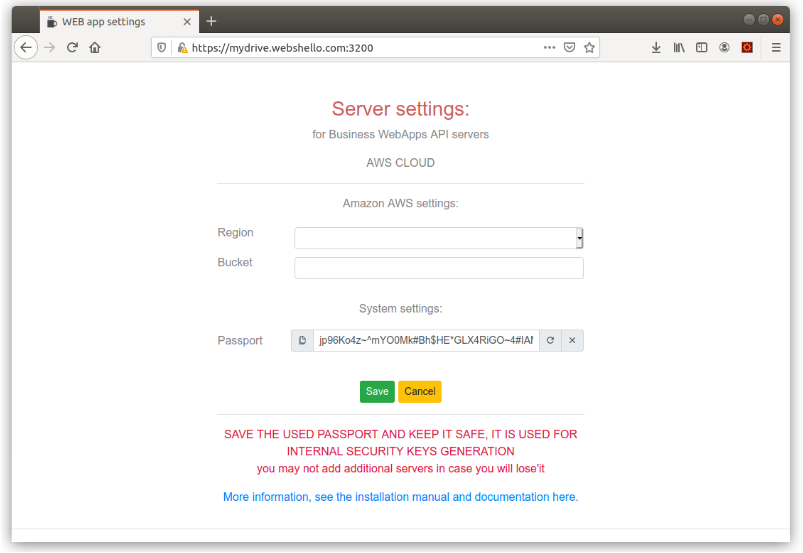
Region – is the AWS region where your S3 bucket is
Bucket – the S3 bucket name
Passport - it is used to generate internal security keys and authorization JWT keys.
It is generated first time, save it and keep it safe on your own device because it can not be recovered, it will be required when new EC2 instances are added.
The passport is linked to the S3 bucket used; you cannot use another passport for the same S3 bucket. Keep it safe in a secured place.
If this is the first server installation for the declared S3 bucket , you will need to set the administrator password; otherwise,
you must enter the administrator password to log in.
You will need to log in to start the web services on the EC2 server.
Add a certified SSL.
SSL certificates are sold by different providers. Free SSLs can be created from "Let's Encrypt."
Use an SSL certificate according to the implementation and your needs. ssls.com sells wildcard certificates that can be used on domains and subdomains,
offering flexibility later.
The SSL certificate provides trust between a web browser and a web server/service.
Use the My-Drive configurationn to set the SSL certificate if it is the first server;
each subsequently added server will read the stored certificate from the S3 CLOUD private bucket.
GET an SSL Certificate
Certified SSL certificates are mandatory.
SSL certificate providers will use different methods to verify that you are the owner of the domain name for which you request a certificate .
The most commonly used methods are:
- Set DNS records as instructed to certify that you own the domain name.
- Place a text file in a specified location that can be used to download the file later (the location is under your domain name address).
- Receive an email at one domain name master address ( such as webmaster...).
https://green-lock.webdo.com is a utility provided to issue a FREE SSL certificate from Let's Encrypt in a short time.
It supports both DNS and FILE check methods.
The Let's Encrypt SSL certificate is valid for 90 days.
You can buy a certified SSL certificate for your domain from SSLS.COM or another provider at choice.
The DNS setting method fits better since the domain is used for web applications and services;
an email may not be associated with it.
2.9 Install a ssl certificate
GET an SSL Certificate
SSL certificate providers will use different methods to verify that you are the owner of the domain name for which you request a certificate .
The most commonly used methods are:
- Set DNS records as instructed to certify that you own the domain name.
- Place a text file in a specified location that can be used to download the file later (the location is under your domain name address).
- Receive an email at one domain name master address ( such as webmaster...).
The DNS setting method fits better since the domain is used for web applications and services; an email may not be associated with it. The file method is also not very reliable..
https://green-lock.webdo.com is a utility provided to issue a FREE SSL certificate from Let's Encrypt in a short time.
It supports both DNS and FILE check methods.
The Let's Encrypt SSL certificate is valid for 90 days.
See https://green-lock.webdo.com/ for a free certificate.
We do recommend SSLS.COM for paid SSL certificates.
Install the certificate:
Use the settings web application to set your new SSL certificate.
You will need to restart the web services after in order to use the new certificate
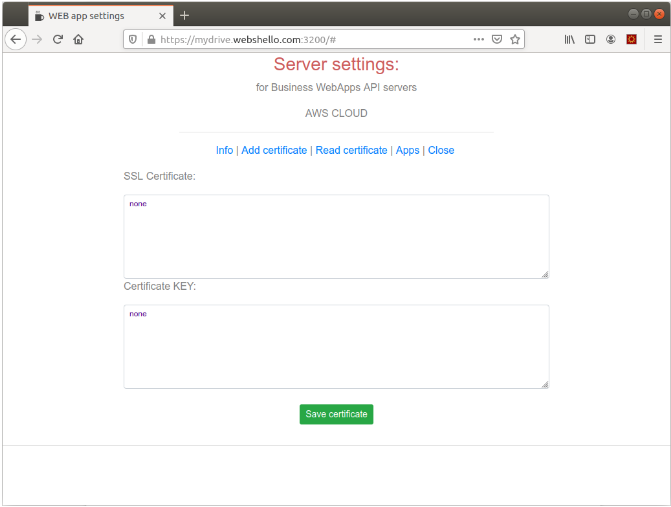
The SSL certificate consists of the certificate key and the complete chain of the certificate.
Some SSL certificate providers will deliver two files for the certificate, ( the certificate and the Authorities Chain ), you will need to create one file from those two in this case.
Ensure there are no empty lines at the beginning or end of the entered certificate/key text. Use the "Read Certificate " tab;
if your certificate is not present , check the certificate and the key, and ensure no empty lines are included (top/bottom).
Reinstall an SSL certificate. Proceed as before: save the new certificate with the web app settings and restart the web services.
2.10 Start the web services
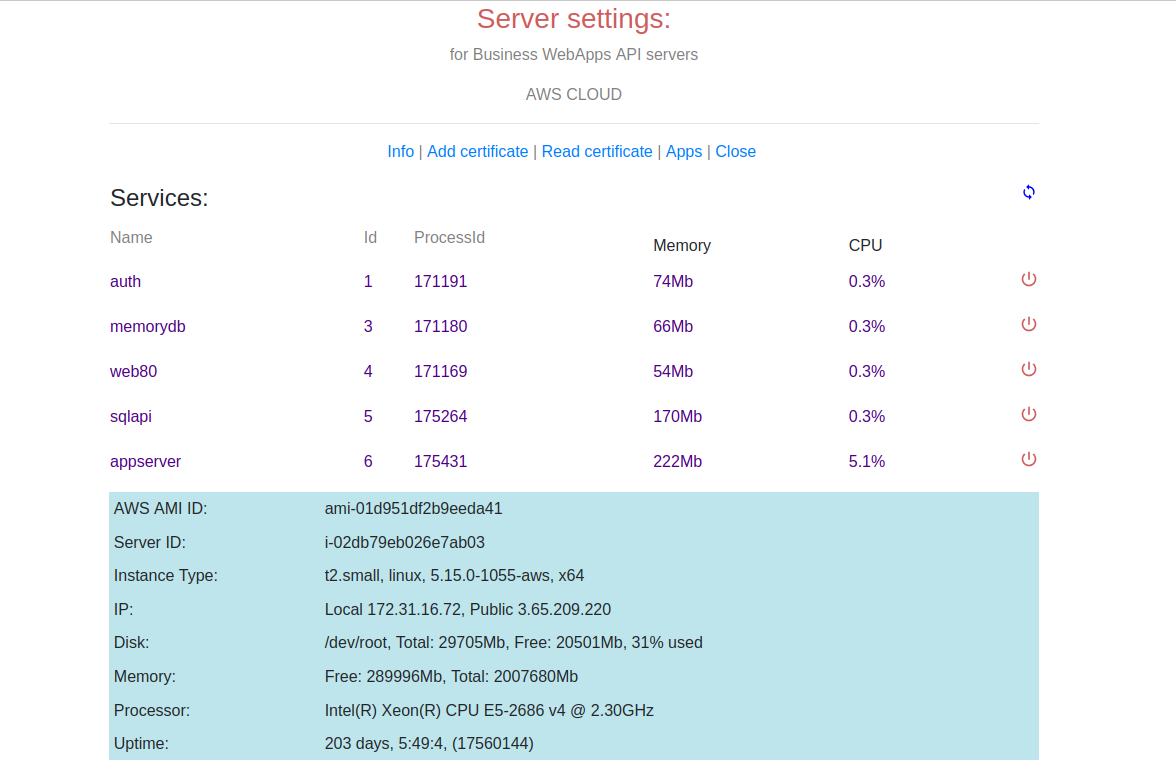
Use the settings web app INFO page to see the server status. Here, you can start or stop used services.
The settings service runs by default. The “memorydb” web services server will not start without an SSL certificate set.
The other services may not work as expected on mobile platforms like Android or iOS without a certified SSL certificate.
Use the "Install ENV ID:" and " Bucket Name :" for reference when installing additional resource servers ;
see the Office Documents / Collabora Online CODE server configurationn.
2.11 Install the database
The system works with a PostgreSQL database by default.
The CE release have a PostgreSQL database installed localy to the EC2 and include a demo database.
The database access settings and APIs management interface:

CE release:For CE release, open the database interface management and configure the database access, it will default to the local PostgreSQL installation. See the previous page "Start the web services" and be sure that you had restarted services after the EC2 installation.
Next database settings steps refers to PRO release only, you can skip to next page.
PRO release:
You will need to add an RDS PostgreSQL database to your AWS account.
Choose the required capacity for your project; it can be changed later. ( the PostgreSQL can be installed to another VPC or can be installed elsewhere, we do recommend the AWS RDS/Aurora as their management is top class. )
There are specifications for the database fields, and some tables are mandatory for application processes.
You will need an interface to manage the database. We recommend pgAdmin v4 or later.
In order to use it, you should edit the VPC security settings and set access to the database from your VPC's for data access and from your office address (to manage the database).
The access to the database, except for administration with pgAdmin, is made only through managed API services . The services implement security validation, CRUD operations, and more.
Configure the Application Data Access API to use your database server.
The address is: https://<your-service-address>:3400 ( sample: https://subdomain.yourdomain.extension:3400 )
The first time, it will start with a settings page that will ask for the database address and credentials to access it. At this time, it will connect to only one database. The API manager will add an additional database to the same server named "rapidenterprise," which will store API-related information. See the documentation for the data access API in next chapters.
Database mandatory tables and table fields:
Necessary fields in tables:
id: character varying - the Primary key
user: character varying - records the last user who modified the record
createdAt: timestamp with time zone - moment of record creation
modifiedAt timestamp with time zone - last modified time
Tables: actionlog, zs_app_mods, zs_app_roles, zs_app_roles_links, zs_app_routes, zs_app_routes_links
actionlog ( SQL )
-- Table: public.actionlog
-- DROP TABLE IF EXISTS public.actionlog;
CREATE TABLE IF NOT EXISTS public.actionlog
(
id character varying COLLATE pg_catalog."default" NOT NULL,
username character varying COLLATE pg_catalog."default",
logtime timestamp with time zone,
tname character varying COLLATE pg_catalog."default",
pky character varying COLLATE pg_catalog."default",
pkyval character varying COLLATE pg_catalog."default",
log text COLLATE pg_catalog."default",
action character varying COLLATE pg_catalog."default",
result bit(1),
rerror text COLLATE pg_catalog."default",
ip character varying COLLATE pg_catalog."default",
origin character varying COLLATE pg_catalog."default",
CONSTRAINT actionlog_pkey PRIMARY KEY (id)
)
TABLESPACE pg_default;
ALTER TABLE IF EXISTS public.actionlog
OWNER to postgres;
zs_app_mods ( SQL )
-- Table: public.zs_app_mods
-- DROP TABLE IF EXISTS public.zs_app_mods;
CREATE TABLE IF NOT EXISTS public.zs_app_mods
(
id character varying COLLATE pg_catalog."default" NOT NULL,
module character varying COLLATE pg_catalog."default",
description text COLLATE pg_catalog."default",
"modifiedAt" timestamp with time zone,
"user" character varying COLLATE pg_catalog."default",
"createdAt" timestamp with time zone,
appname character varying COLLATE pg_catalog."default",
CONSTRAINT zs_app_mods_pkey PRIMARY KEY (id)
)
TABLESPACE pg_default;
ALTER TABLE IF EXISTS public.zs_app_mods
OWNER to postgres;
zs_app_roles (SQL)
-- Table: public.zs_app_roles
-- DROP TABLE IF EXISTS public.zs_app_roles;
CREATE TABLE IF NOT EXISTS public.zs_app_roles
(
id character varying COLLATE pg_catalog."default" NOT NULL,
role character varying COLLATE pg_catalog."default",
description text COLLATE pg_catalog."default",
"user" character varying COLLATE pg_catalog."default",
"createdAt" timestamp with time zone,
"modifiedAt" timestamp with time zone,
CONSTRAINT zs_app_roles_pkey PRIMARY KEY (id)
)
TABLESPACE pg_default;
ALTER TABLE IF EXISTS public.zs_app_roles
OWNER to postgres;
zs_app_roles_links( SQL )
-- Table: public.zs_app_roles_links
-- DROP TABLE IF EXISTS public.zs_app_roles_links;
CREATE TABLE IF NOT EXISTS public.zs_app_roles_links
(
id character varying COLLATE pg_catalog."default" NOT NULL,
role_id character varying COLLATE pg_catalog."default",
type character varying COLLATE pg_catalog."default",
rname character varying COLLATE pg_catalog."default",
"user" character varying COLLATE pg_catalog."default",
"createdAt" timestamp with time zone,
"modifiedAt" timestamp with time zone,
description text COLLATE pg_catalog."default",
field character varying COLLATE pg_catalog."default",
rt boolean DEFAULT false,
fv character varying COLLATE pg_catalog."default",
CONSTRAINT zs_app_roles_links_pkey PRIMARY KEY (id)
)
TABLESPACE pg_default;
ALTER TABLE IF EXISTS public.zs_app_roles_links
OWNER to postgres;
zs_app_routes ( SQL )
-- Table: public.zs_app_routes
-- DROP TABLE IF EXISTS public.zs_app_routes;
CREATE TABLE IF NOT EXISTS public.zs_app_routes
(
id character varying COLLATE pg_catalog."default" NOT NULL,
route character varying COLLATE pg_catalog."default",
mod_id character varying COLLATE pg_catalog."default",
description text COLLATE pg_catalog."default",
"user" character varying COLLATE pg_catalog."default",
"createdAt" timestamp with time zone,
"modifiedAt" timestamp with time zone,
CONSTRAINT zs_app_routes_pkey PRIMARY KEY (id)
)
TABLESPACE pg_default;
ALTER TABLE IF EXISTS public.zs_app_routes
OWNER to postgres;
zs_app_routes_links ( SQL )
-- Table: public.zs_app_routes_links
-- DROP TABLE IF EXISTS public.zs_app_routes_links;
CREATE TABLE IF NOT EXISTS public.zs_app_routes_links
(
id character varying COLLATE pg_catalog."default" NOT NULL,
type character varying COLLATE pg_catalog."default",
rname character varying COLLATE pg_catalog."default",
route_id character varying COLLATE pg_catalog."default",
"user" character varying COLLATE pg_catalog."default",
"createdAt" timestamp with time zone,
"modifiedAt" timestamp with time zone,
CONSTRAINT zs_app_routes_links_pkey PRIMARY KEY (id)
)
TABLESPACE pg_default;
ALTER TABLE IF EXISTS public.zs_app_routes_links
OWNER to postgres;
2.12 Install the web application
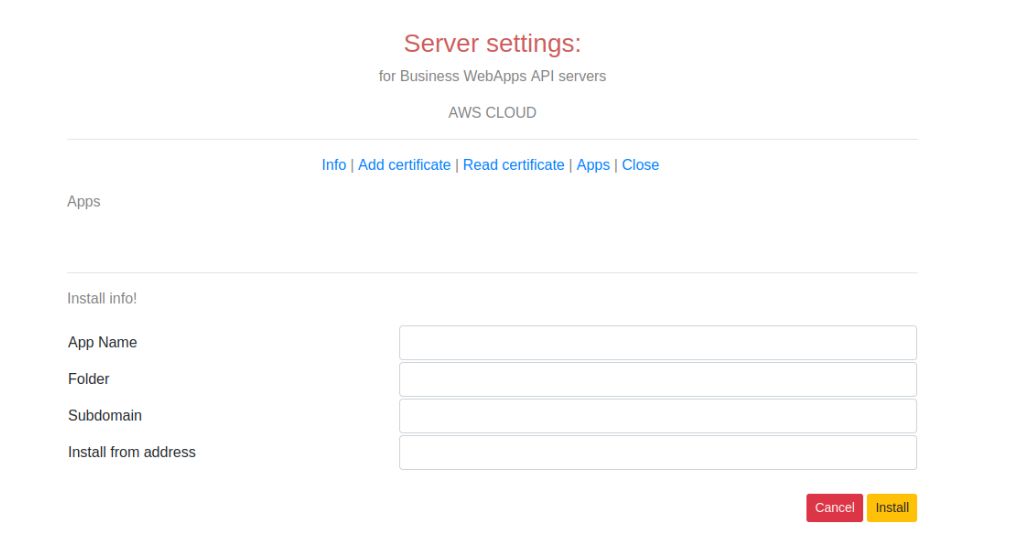
At this point, your system services are up and running; however, there are no web apps in place. Web apps are installed into the " Administrator " account in the "Applications/webroot/website" folder,
but the drive file management is not in place.
To install the required web applications, you will need to use the Settings app and install the app from the "Apps" tab.
The application is copied from a web address repository.
Required fields:
| App Name: | - the application name, it is used in the installed applications list to identify your app. |
| Folder: | - the child folder to "Applications/webroot/website/" to install to ( it is created if not exist ). |
| Subdomain: | - leave blank at this time |
| Install from address: | copy next address https://jsapp.webdo.com/install/1.3 |
3. Web client
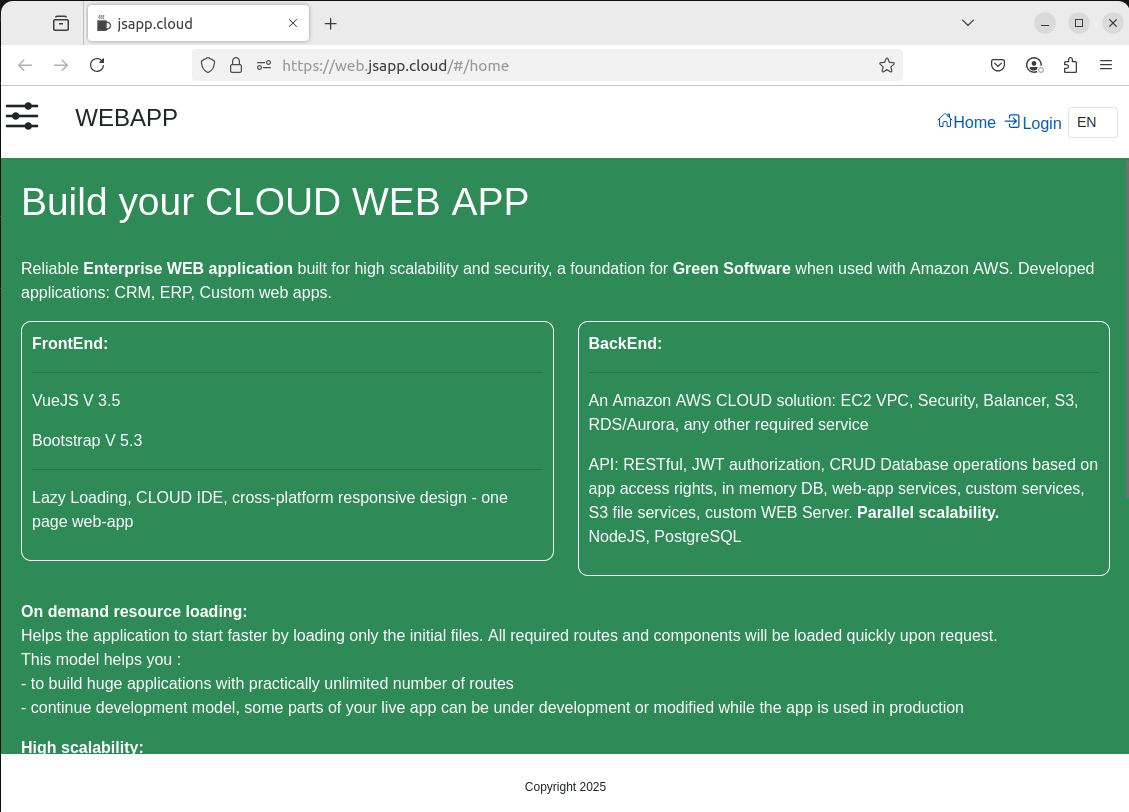
The "Web client" refers to the web application delivered by default. It presents the web interfaces and the application structure to quickly build your new business user interfaces. The application comes with default modules that are needed for all applications , user management, application access rights management, CLOUD drive application, and reporting .
It is stored in a cloud S3 bucket file system and offers seamlessly the same resource to any web server in the load balancing pool by default. To achieve this , a CDN cloud file system like Cloudflare is typically used. Our solution uses customized web servers that connect and serve resources from your own secured S3 bucket. This solves the problem of having the same source files for horizontal scalability in a transparent manner.
We are using a single-page web application model based on the Vue.js framework and Bootstrap CSS. It can present the interface in supported languages. Labels are kept in JSON files for easy management. The context help files system is implemented (the F1 key is used to open the help file for the current app route). See the "Frontend Programming" chapter for more details.
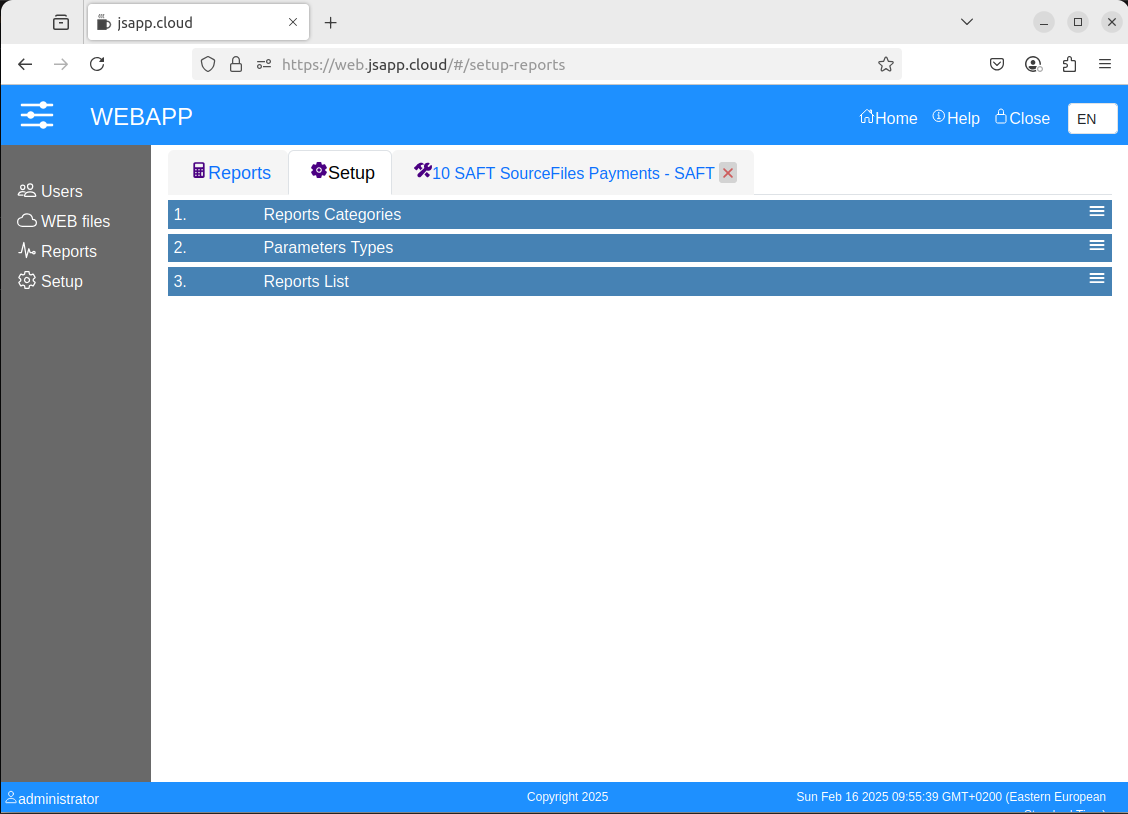
It solves the problem of messy menus that are hard to follow and use. The only standard top menu is basic; next, there is a module selection menu (left modules list in the next image), and each module uses tabs for its routes (master tabs and tabs opened for business document interfaces). Document tabs can be closed, allowing you to have different documents open at once, such as invoices or whatever the module manages. Modules access is managed by the user groups roles, users will see only the modules they are allowed to see.
On-demand loading of the routes provides you with the ability to host a virtually unlimited number of routes with the same loading speed. A second benefit of this model pertains to application reliability and robustness. If there are errors on certain routes or components, the application will still start and function with other routes; from a continuous development or app maintenance perspective, this allows you to add features or modify routes while the application is in a production environment.
Reminder: You will have a starting project for a single-page web application with a standard UX that gracefully manages menus and offers, by default, internationalization, user help system, and on-demand loading for speed and reliability. See Frontend Programming for more.
3.1 Web drive
Based on the system web-drive APIs, this module offers file storage resources to your application users.
It is not intended to replace the device file system; rather, it is a secure vault for files.
It offers the possibility to share folders within groups or with users. The file storage is the AWS S3 bucket, and files are stored encrypted .
The encryption / decryption is implemented on the data transfer stream, meaning that your files are always protected.
Encryption uses AES256 and a large key.
While it implements a RESTful standard API, the web storage API does not implement communication standards that can be used by ransomware malware.
The web-drive module is included by default in your startup application; it can be disabled in the app configurationn file.
It can be allocated to specific user groups.
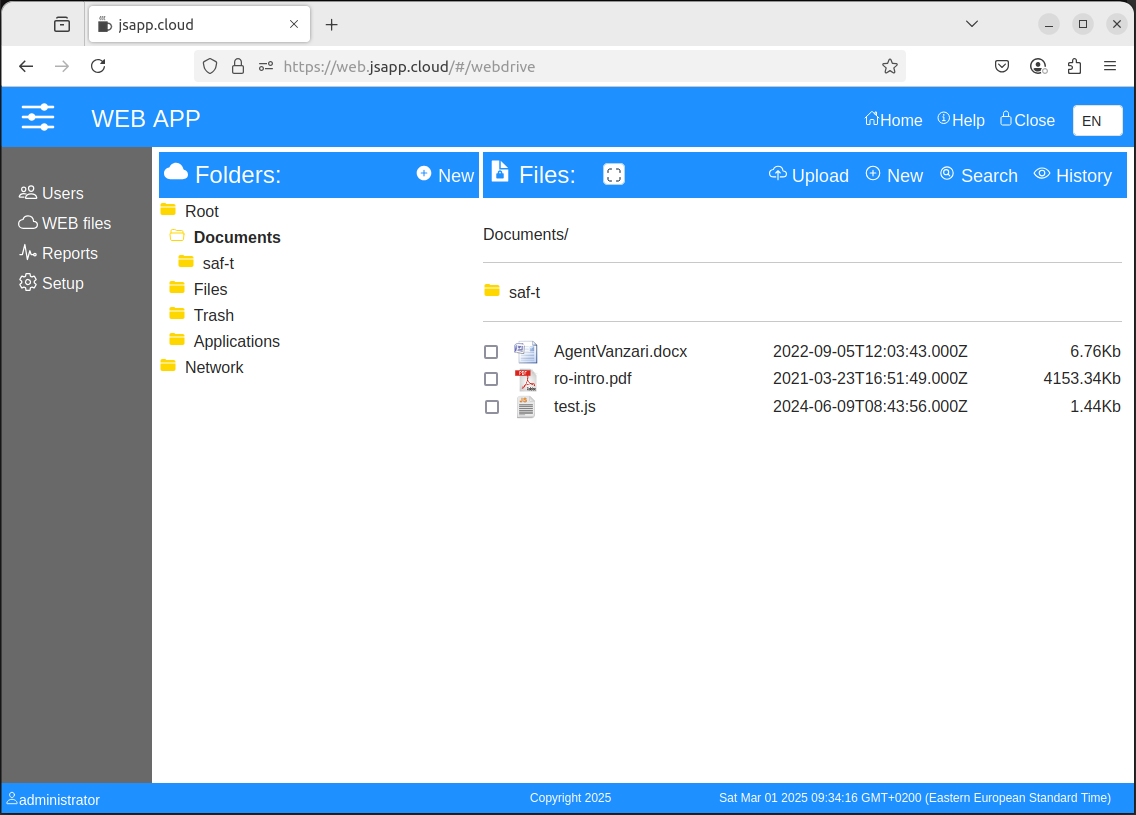
The AWS S3 is probably the best implementation; it offers a flat access rate, high reliability, and multiple security measures.
The DRIVE API offers options to use the selected S3 bucket like a drive with folder structures, copy/paste within the drive application, folder uploads and shared folders.
The API is RESTful and requires JWT authorization. While it is a standard API, it does not implement standards used for third-party file sharing or access like WEBDAV;
thus, it cannot be easily exploited by a very dedicated ransomware attack and cannot be exploited by a standard ransomware attack.
The bucket is not seen as a whole drive but as a collection of users' drives , given that when a user's credentials are compromised, only that user may lose information.
The logfile will save information related to file access, storing the IP address as well.
The DRIVE API can be used with a dedicated S3 bucket and will implement a structure of the resource ID keys; it cannot be used with random buckets and their files.
See the "backend" information for DRIVE API.
3.1.1. Office Documents
Next releases of JSAPP.CLOUD implement the WOPI protocol for Web Office platforms like Collabora Online and Microsoft 365.
- CE SMB
- PRO
- Enterprise
The WOPI protocol gives access to an external Web Office application to access your files with Office document editors .
WOPI is a standard protocol, and the implementation should work with any Web Office application that implements the WOPI client part.
We use Collabora Online in our demo application ( office.jsapp.cloud ). ( Collabora Online CODE ).
Collabora is safer since it can be installed in your own private cloud; no third party has access to your files at any moment .
With MS 365, you entrust your files to Microsoft. While MS is a trustworthy partner, there is a chance that your files may be compromised.

3.2 Web reports
The web reports module is a necessity for most business applications . It can be disabled and accessed only with specific group rights.
The web reports module implements:
- interfaces to manage the reports (categories, report lists, edit reports)
- interfaces to run and present the configured reports.
Available report types are:
- List grids (exports to Excel)
- CrossTab
- PivotTable (exports to Excel as a worksheet result)
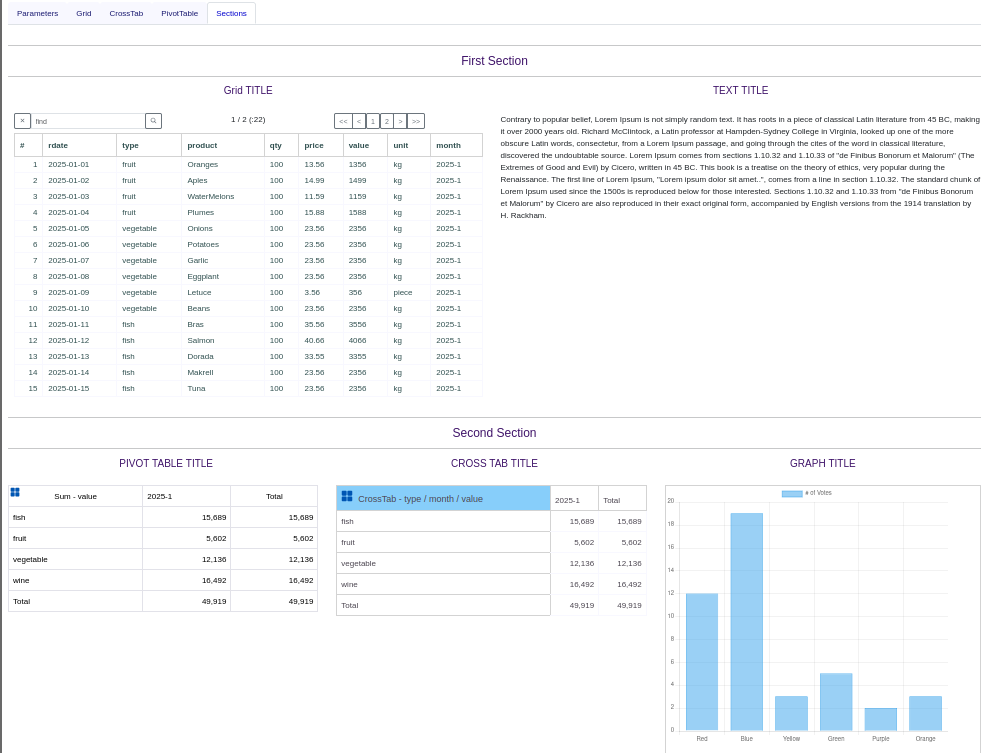
- Complex report - Dashboards like (combine other report types into a report page with tabs)
Specific help for interface options and usage for reports management may be provided within the application.
Reports can be created or modified using the administrator account. Same for the SQL API management web-app.
3.2.1 Report types
The reports are focused on reports usability and efficiency.
Reports that allow you to explore data like CrossTab and PivotTable are available.
There are also multi-page complex reports that present different view types at once.
CrossTab and PivotTable can be rotated at runtime.
The available report types are Grid, CrossTab, PivotTable, Text/HTML, Graph.
One report will get data from the system database but it is not limited, it can be programmed to get data from other sources as well including third party or local AI APIs.
Export to Excel XLSX is used.
See 3.2.2 next for more information.
3.2.2 Edit report
Reports can be created or modified using the administrator account.
From the reports module, select the "Setup" tab.
First you will need to set some reports categories. Add categories into Reports Categories.
Create a new report ussing the Add icon button into the Reports List.
Edit a report by selecting form the Reports list.
The report editor app route have six tabs:
- Report Info, manages the general information about the report;
- Report parameters, the report parameters required to run the report ( available at run time );
- Used SQL queries, reports SQL queries names, the sql's should exist into the SQL API list;
- Before Script - a JS script that run localy (report runtime only) before SQL requests to the database API;
- After Script - a JS script that run localy (report runtime only) after the required SQL queries are retrieved;
- Report type - configure the report according to available options;
Creating a report requires SQL skills and JS programming for advanced reports. One report can be created just from the SQL result in short time,
however some reports will require more effort and probably the After JS script.
Some report view types works with objects that should be defined into the After JS script only.
Report Info
Here you will set the report name and category, you can set the report availability and access rights.
One report can be copied, the default copy name is unique, the report copy will be added to the report category reports.
Report parameters
At runtime, an interface will be provided to the user for data entry of the required parameters.
Here you can add the parameters of choice.
- label - the runtime label;
- name - parameter name;
- from - the name of the parameter in this list or from the system ('organization'),
the parameter with "from" property will not have an entry form at runtime;
- order;
- type - parameter type, the "select" type can use an SQL name to load a list at runtime from witch the parameter value will be selected;
- default - a default value for the parameter, useful when you edit and test the report;
Used SQL queries
The system uses an SQL API to access the database, sending SQL queries statements to the server is not allowed for obvious reasons.
The API Access point is set into the system configuration file ( base ).
The web application for SQL queries statements management can be found at https://<your app domain address>:3400 - see "2.11 Install the database"
In order to GET data from the database, queries should be defined into the SQL API interface, see the help file from the SQL API admin application.
Here you will add the SQL name and set the required parameters to be sent from available parameters list.
Before Script - it is not mandatory, a JS script that allows you tou change the parameters list just before the SQL queries are retrieved.
After Script
It is not mandatory, a JS script that allows you tou change or prepare the datasets for your report views, you can add new arrays and objects to the result.
The modified, added lists or objects will be used later at Report Type
Report Type
Here you will set the report view type.
There are several easy to configure report types like Grid, CrossTab, PivotTable that requires only the dataset name and few parameters.
The "Complex Report" type it present the reports with multi page option, each page is split in sections, each section can have from one to three columns.
The basic block into the Complex Report is the section column, each column require configurationn.
Available section column view types are Grid, CrossTab, Text, HTML and Graph.
Grid, CrossTab and PivotTab uses list datasets and configurationn parameters.
Text, HTML and Graph requires a JSON object to be set into the "After JS" script.
- Text will show a text ...
- HTML will bind a HTML markup from the added object, you have to create the HTML text by hand
- Graph requires an object according with desired graph type and available data. Here the ChartJS from www.chartjs.org is used.
3.2.3 Reports access rights
Available for the "PRO" edition, you can add rules to manage the reports access rights per user and users groups.
The "LE" edition, does not implement reports access rights. All available five active users have the same rights to run reports.
3.3 Users management
The user management is secured by default.
There are users and user groups; each user can be part of one or more user groups.
A user cannot be deleted from the system; however, it can be deactivated. Users can change their passwords.
The username cannot be changed. You can change the first name, last name, or other user information, but not the username.
A user management module is included in the web client application; it can be used by designated administrators or the system administrator.
The user groups are used to allocate access rights within the application .
There are no user lists in the PostgreSQL database; however, you may find usernames linked to some records , such as employee records or similar .
Specific interface options and usage are provided with the application help base.
4 Access rights
For access rights setup, the Setup module is used. Use the user management module to allocate users to groups.
Rights are allocated to access modules, routes, queries, and tables for roles that are linked to user groups.
By combining resources into sets and allocating those to user groups by roles, specific access can be achieved.
Even if one user can access a specific route, it will have no data until rights are allocated to it.
Access to routes can be set into the module menu setup code also to add complexity to the model ( frontend programming ).
The backend resource access is verified at the request data access level by the API web service, part of the system's security.
Specific help pages for the Setup module are available in the application help manual.
5. Frontend programming
Document purpose
----------------
This document describes how to extend the standard JSAPP.CLOUD web client
with application modules, routes, components, navigation tabs, database
requests, file attachments, labels, and contextual help.
The examples are based on:
- Vue.js 3.5;
- Bootstrap 5.3;
- the JSAPP.CLOUD lazy-loading application model;
- the CRM demonstration module;
- the PostgreSQL RAPID API.
The exact properties exposed by webapp.js and functions.js can change
between platform releases. Check the installed versions of those files
before using a helper not demonstrated by an existing route.
5.1. Frontend architecture
The delivered frontend is a Vue single-page application. It provides:
- login and JWT authorization;
- responsive application layout;
- application module selection;
- fixed and closable tabs;
- lazy-loaded routes;
- lazy-loaded components;
- international labels;
- contextual help;
- role-controlled menus;
- common database and file helpers.
The frontend is stored in the administrator's private S3-backed drive:
Applications/webroot/website/This is also the root folder served by the application web server.
A route is normally divided into:
- an HTML file containing the Vue template;
- a JavaScript file exporting the Vue component object;
- an optional CSS file;
- optional child components, each with its own HTML and JavaScript files.
Routes and components are loaded only when required. This reduces the
initial application load and isolates route-level programming errors.
5.2. Project structure
A typical application structure is:
website/
index.html
favicon.ico
dst/
config/
config.json
labels/
en.json
<language>.jsoncss/
bootstrap.css
default.csshelp/
index.html
help.js
css/
files/
img/img/js/
webapp.js
functions.js
custom.js
system/
vue libraries
axios libraries
bootstrap libraries
other third-party librariesroutes/
list.jsonbase/
list.json
start/
home.html
home.js
component/drive/
list.jsonusers/
list.jsonsetup/
list.jsonreports/
list.json<custom-module>/
list.json
<route-folder>/
<route>.html
<route>.js
<route>.css
component/
<component>.html
<component>.jsThe standard modules available in an installation depend on the selected
JSAPP.CLOUD edition.
5.3. Application configurationn
3.1 Main configurationn
----------------------
The main application configurationn is:
dst/config/config.jsonAmong other settings, it contains the application module menu in the
"lmenu" array.
Example CRM module link:
{
"_name": "crm-start",
"_route": "/crm-start",
"_text": "CRM",
"_title": "CRM",
"_icon": "business-outline",
"app": "crm",
"path": "crm",
"label": "lblCRM",
"titleLabel": "lblCRM"
}
Properties:
_name
Name of the initial Vue route.
_route
Initial route URL. It normally begins with "/"._text
Fallback module text._title
Fallback module title._icon
Ionicons icon name.app
Unique application module code.path
Module folder below dst/routes.label
International label key.titleLabel
International title label key.Do not store passwords, database credentials, AWS keys, JWT signing keys,
or third-party API keys in config.json. This file is delivered to the
browser.
3.2 Global module registry
--------------------------
Application modules are registered in:
dst/routes/list.jsonExample:
[
{
"code": "base",
"title": "Base routes",
"path": "base",
"enabled": true
},
{
"code": "crm",
"title": "CRM",
"path": "crm",
"enabled": true
}
]
JSON does not support comments or trailing commas.
3.3 Module list.json
--------------------
Each module has a list.json file. It declares:
- module information;
- routes;
- components;
- fixed tab menus.
Example:
{
"app": "crm",
"path": "crm",
"routes": [
{
"route": "crm-start",
"path": "start",
"html": "crm-start.html",
"code": "crm-start.js",
"components": [
"cmp-crm-start"
]
},
{
"route": "customer-file",
"path": "customer",
"html": "customer-file.html",
"code": "customer-file.js",
"components": []
}
],"components": [
{
"cname": "cmp-crm-start",
"path": "start/component",
"html": "cmp-crm-start.html",
"code": "cmp-crm-start.js"
}
],"menus": [
{
"_name": "crm-start",
"_route": "/crm-start",
"_text": "lblCRM",
"_title": "lblCRM",
"_icon": "ribbon",
"tp": "master",
"app": "crm"
}
]
}5.4. Creating a module
The following example creates a module named "stock".
Step 1: Add the module link
---------------------------
Add to config.json/lmenu:
{
"_name": "stock-start",
"_route": "/stock-start",
"_text": "Stock",
"_title": "Stock",
"_icon": "cube-outline",
"app": "stock",
"path": "stock",
"label": "lblStock",
"titleLabel": "lblStock"
}
Step 2: Register the module
---------------------------
Add to dst/routes/list.json:
{
"code": "stock",
"title": "Stock",
"path": "stock",
"enabled": true
}
Step 3: Create folders
----------------------
Create:
dst/routes/stock/
dst/routes/stock/start/
dst/routes/stock/start/component/
Step 4: Create the module list
------------------------------
Create dst/routes/stock/list.json:
{
"app": "stock",
"path": "stock",
"routes": [
{
"route": "stock-start",
"path": "start",
"html": "stock-start.html",
"code": "stock-start.js",
"components": []
}
],"components": [],"menus": [
{
"_name": "stock-start",
"_route": "/stock-start",
"_text": "lblStock",
"_title": "lblStock",
"_icon": "cube-outline",
"tp": "master",
"app": "stock"
}
]
}Step 5: Add route files
-----------------------
Create:
dst/routes/stock/start/stock-start.html
dst/routes/stock/start/stock-start.js
Step 6: Add labels
------------------
Add the following key to every language file:
"lblStock": "Stock"Step 7: Configure access rights
-------------------------------
Register the module and its routes in the Setup module. Assign application
roles to the appropriate user groups.
Menu access does not replace backend authorization. Configure query and
table rights separately.
5.5. Programming a route
5.1 Minimal route JavaScript
----------------------------
File:
dst/routes/stock/start/stock-start.jsContent:
'use strict';export var component = {
props: ['parent'],data() {
return {
root: this.parent,
appname: 'stock',
helpfile: 'stock-start',
organization: this.parent.selectedORG,
labels: this.parent.labels,
records: [],
loading: false,
errorMessage: ''
};
},created() {
this.parent.chelp = this.helpfile;
},mounted() {
this.fetchData();
this.parent.resetLanguage = this.resetLanguage;
},methods: {
fetchData() {
console.log('stock-start fetchData');
},resetLanguage() {
this.labels = this.parent.labels;
}
}
};The dynamic loader expects the named export:
export var componentDo not replace it with an arbitrary export name unless webapp.js has also
been changed.
5.2 Minimal route HTML
----------------------
File:
dst/routes/stock/start/stock-start.htmlContent:
<div class="row rnomargin" style="padding:10px;">
<div class="col-md-12">
<app-submenu :root="parent"></app-submenu>
</div>
<div class="col-md-12">
<br>
<h3>{{labels.lblStock}}</h3><div v-if="loading">
<img src="dst/img/loading.gif" alt="Loading">
</div><div class="alert alert-danger" v-if="errorMessage">
{{errorMessage}}
</div>
</div>
</div>5.3 Route-specific CSS
----------------------
Create:
dst/routes/stock/start/stock-start.cssLoad it from the route HTML:
<link
rel="stylesheet"
type="text/css"
href="dst/routes/stock/start/stock-start.css?v=1"
>
Change the version query parameter after changing CSS if browser caching
prevents the current file from loading.
5.4 Route lifecycle
-------------------
Recommended use:
created()
Set contextual help and initialize local state that does not
require the rendered DOM.
mounted()
Load data and interact with rendered DOM elements.beforeUnmount()
Remove manually registered DOM listeners, timers, and subscriptions.Do not call the same initial data-loading function from both created() and
mounted() unless two requests are intentionally required.
5.6. The parent system object
The route receives part of the main application state through:
<router-view :parent="system"></router-view>Common parent properties include:
parent.chelp
Current contextual help identifier.
parent.userinfo
Current user information.parent.authorized
Current JWT authorization token.parent.config
Application configurationn.parent.selectedORG
Selected organization, if organization support is enabled.parent.datamethod
Shared functions exposed by functions.js.parent.addresses
Backend server and access-point configurationn.parent.apps
Loaded application modules and their tab menus.parent.appsdata
Shared application data.parent.appwindow
Window and layout data.parent.dataError
Global application error state.parent.dataInfo
Global informational-message state.parent.ajax
AJAX helper in releases that expose it.parent.extra
Functions loaded from custom.js.Only use properties provided by the installed webapp.js release.
5.7. Components
7.1 Declaring a component
-------------------------
Add to the module's components array:
{
"cname": "stock-grid",
"path": "start/component",
"html": "stock-grid.html",
"code": "stock-grid.js"
}
Add the component name to the route:
{
"route": "stock-start",
"path": "start",
"html": "stock-start.html",
"code": "stock-start.js",
"components": [
"stock-grid"
]
}
7.2 Component JavaScript
------------------------
File:
dst/routes/stock/start/component/stock-grid.jsContent:
'use strict';export var component = {
props: ['root', 'labels', 'records'],data() {
return {
cname: 'stock-grid',
selectedId: null
};
},methods: {
selectRecord(record) {
this.selectedId = record.id;
}
}
};7.3 Component HTML
------------------
File:
dst/routes/stock/start/component/stock-grid.htmlContent:
<div class="table-responsive">
<table class="table table-hover">
<thead>
<tr>
<th>{{labels.lblCode}}</th>
<th>{{labels.lblProductName}}</th>
<th class="text-end">{{labels.lblQty}}</th>
</tr>
</thead>
<tbody>
<tr
v-for="record in records"
:key="record.id"
@click="selectRecord(record)"
>
<td>{{record.product_code}}</td>
<td>{{record.product_name}}</td>
<td class="text-end">{{record.qty}}</td>
</tr>
</tbody>
</table>
</div>7.4 Using the component
-----------------------
In the route HTML:
<stock-grid
:root="parent"
:labels="labels"
:records="records">
</stock-grid>
7.5 Component rules
-------------------
- Component names must be unique across the application.
- Do not directly modify a prop.
- Create an editable copy when required.
- Use a unique :key for v-for records.
- Declare every non-global component in the route's components array.
- A component loaded by the base/home route can be used globally later.
7.6 Editable copies
-------------------
For plain JSON-compatible records:
this.editRecord = JSON.parse(JSON.stringify(record));This method does not preserve Date, Map, Set, File, undefined, or circular
references. Use structuredClone when the supported browsers and data type
permit it:
this.editRecord = structuredClone(record);5.8. Fixed and temporary tabs
8.1 Fixed tabs
--------------
Fixed tabs are stored in the module's menus array:
{
"_name": "stock-start",
"_route": "/stock-start",
"_text": "lblStock",
"_title": "lblStock",
"_icon": "cube-outline",
"tp": "master",
"app": "stock"
}
The value:
"tp": "master"identifies a permanent tab.
8.2 Temporary document tabs
---------------------------
A closable document tab uses:
"tp": "slave"Example:
openProduct(product) {
const td = this;
td.root.apps.forEach(function (appModule) {
if (appModule.app !== td.appname) {
return;
}const tabId = 'product-' + product.id;const existing = appModule.menus.find(function (menu) {
return menu.tid === tabId;
});if (existing) {
td.root.selecttab(td, existing);
return;
}const newTab = {
_name: 'product-file',
_route: '/product-file',
_text: 'lblSpace',
_title: 'lblSpace',
_icon: 'document-text-outline',
tp: 'slave',
app: td.appname,
tid: tabId,
tn: product.product_name,
editable: true,
editmode: false,
saving: false,
data: {
emsg: '',
record: product,
edit: JSON.parse(JSON.stringify(product))
},
class: 'active'
};appModule.menus.push(newTab);
td.root.selectnewtab(td);
});
}When called from a child component, the installed release may expect the
owning route:
this.root.selectnewtab(this.$parent);
this.root.selecttab(this.$parent, menu);
Follow the pattern used by the installed app-submenu component.
8.3 Reading the active tab
--------------------------
A document route can locate its active tab:
findActiveTab() {
const td = this;
for (const appModule of td.parent.apps) {
if (appModule.app !== td.appname) {
continue;
}const active = appModule.menus.find(function (menu) {
return menu.class === 'active';
});if (active) {
td.tab = active;
return active;
}
}return null;
}Validate the tab before reading its record:
const active = this.findActiveTab();if (!active || !active.data || !active.data.record) {
this.errorMessage = 'The document tab has no record.';
return;
}8.4 Unique tab identifiers
--------------------------
Do not use only a raw record ID if different document types can share the
same ID. Use a type prefix:
tid: 'customer-' + customer.id
tid: 'order-' + order.id
tid: 'call-' + call.id
5.9. Internationalization
Labels are stored in:
dst/config/labels/<language-code>.jsonExample en.json content:
{
"lblStock": "Stock",
"lblCode": "Code",
"lblProductName": "Product name",
"lblQty": "Quantity",
"lblSave": "Save",
"lblClose": "Close"
}
Use a label in HTML:
{{labels.lblProductName}}Use it in JavaScript:
this.labels.lblProductNameWhen adding a label:
1. Add the same key to every supported language file.
2. Validate each JSON file.
3. Avoid duplicate keys.
4. Implement resetLanguage in routes with a local labels reference.
Example:
resetLanguage() {
this.labels = this.parent.labels;
}
5.10. Contextual help
Set the help identifier in the route:
created() {
this.parent.chelp = 'product-file';
}
The corresponding help section follows the existing help system format:
<section><!--product-file-->
...
</section>
The F1 action opens the section associated with parent.chelp.
Use lowercase, unique help identifiers and keep them synchronized with
the route's helpfile value.
5.11. Shared frontend functions
Shared functions are normally available through:
this.parent.datamethodor, inside a component:
this.root.datamethod11.1 Modal functions
--------------------
Show a Bootstrap modal:
this.parent.datamethod.showmodal('productForm');Hide it:
this.parent.datamethod.hidemodal('productForm');11.2 Date conversion
--------------------
const dateValue = this.parent.datamethod.getOnlyDate(
new Date(),
'ymd',
'-'
);
Example result:
2026-08-3111.3 Array sorting
------------------
this.parent.datamethod.sortarray(
this.records,
'product_name',
'asc'
);
11.4 UUID generation
--------------------
Use:
const id = this.parent.datamethod.uuid();Do not use:
const id = this.parent.datamethod.uuid;The second form stores the function itself instead of calling it.
11.5 Shared table helpers
-------------------------
Some grid components install table functions with:
this.root.datamethod.addmodule(this, ['intablef']);Depending on functions.js, this can add methods such as:
- searchintable;
- closesearch;
- entersearch;
- tselect;
- showTableSettings;
- setTableRows.
Inspect the installed functions.js for the exact functions and parameters.
5.12. Custom frontend functions
Application-specific functions can be added to:
dst/js/custom.jsExample:
'use strict';var extra = {
calculateLineTotal: function (qty, price) {
return Number(
(Number(qty || 0) * Number(price || 0)).toFixed(2)
);
}
};Use it from a route:
const total = this.parent.extra.calculateLineTotal(5, 12.75);Never put secrets in custom.js. Browser JavaScript can be downloaded and
read by an application user.
5.13. Calling an API with ask4
13.1 General form
-----------------
this.parent.datamethod.ask4(
systemData,
serviceName,
accessPoint,
apiName,
method,
data,
token,
callback,
headers
);
Parameters:
systemData
this.parent in a route or this.root in a component.
serviceName
Configured service group, such as "base" or "server".accessPoint
API access point, such as "rapid" or "extra".apiName
Endpoint path and query string.method
GET, POST, PUT, or DELETE.data
Request body.token
Usually:
{ t: 'Bearer', v: this.parent.authorized }callback
Function called as:
callback(error, data)headers
Optional additional headers.13.2 Loading records
--------------------
fetchData(force) {
const td = this;
const dm = td.parent.datamethod;
if (td.records.length > 0 && !force) {
return;
}td.loading = true;
td.errorMessage = '';dm.ask4(
td.parent,
'base',
'rapid',
'rpdquery?csql=products&limit=100&offset=0',
'GET',
{},
{
t: 'Bearer',
v: td.parent.authorized
},
function (error, data) {
td.loading = false;if (error) {
console.error('Product request failed:', error);
td.errorMessage = 'Products could not be loaded.';
return;
}td.records =
data && Array.isArray(data.products)
? data.products
: [];
}
);
}13.3 Query parameters
---------------------
Always encode browser values:
const customerId = encodeURIComponent(this.customerId);const endpoint =
'rpdquery?csql=customeraddresses' +
'&cid=' + customerId +
'&limit=100' +
'&offset=0';Do not concatenate unencoded company names, email addresses, descriptions,
or other user-entered values into a URL.
13.4 Additional headers
-----------------------
Optional header format:
[
{
h: 'Content-Type',
v: 'application/json; charset=utf-8'
}
]
5.14. CRUD examples
14.1 Create a record
--------------------
saveNewProduct() {
const td = this;
const dm = td.parent.datamethod;
const product = {
id: dm.uuid(),
product_name: String(td.form.product_name || '').trim(),
product_code: String(td.form.product_code || '').trim(),
price: Number(td.form.price),
isactive: Boolean(td.form.isactive)
};if (!product.product_name || !product.product_code) {
td.errorMessage = 'Product name and code are required.';
return;
}td.saving = true;dm.ask4(
td.parent,
'base',
'rapid',
'products',
'POST',
product,
{ t: 'Bearer', v: td.parent.authorized },
function (error, data) {
td.saving = false;if (error || !data) {
td.errorMessage = 'The product could not be saved.';
return;
}td.fetchData(true);
dm.hidemodal('productForm');
}
);
}14.2 Update a record
--------------------
updateProduct() {
const td = this;
const dm = td.parent.datamethod;
const update = {
id: td.form.id,
product_name: String(td.form.product_name || '').trim(),
price: Number(td.form.price),
isactive: Boolean(td.form.isactive)
};dm.ask4(
td.parent,
'base',
'rapid',
'products',
'PUT',
update,
{ t: 'Bearer', v: td.parent.authorized },
function (error, data) {
if (error || !data) {
td.errorMessage = 'The product could not be updated.';
return;
}td.fetchData(true);
}
);
}14.3 Delete a record
--------------------
deleteProduct(product) {
const td = this;
const id = encodeURIComponent(product.id);
td.parent.datamethod.ask4(
td.parent,
'base',
'rapid',
'products?id=' + id,
'DELETE',
{},
{ t: 'Bearer', v: td.parent.authorized },
function (error, data) {
if (error || !data) {
td.errorMessage = 'The product could not be deleted.';
return;
}td.fetchData(true);
}
);
}5.15. Transactional writes
Use /rapid/up_tdata when related records must all succeed or all fail.
Example: create a customer, primary address, and primary contact.
saveCustomer() {
const td = this;
const dm = td.root.datamethod;
const customerId = dm.uuid();
const addressId = dm.uuid();
const contactId = dm.uuid();const request = {
data: {
customers: [
{
id: customerId,
company: td.form.company,
fiscalid: td.form.fiscalid,
main_address: addressId,
main_contact: contactId,
rpdstatus: 1
}
],customers_addresses: [
{
id: addressId,
customer_id: customerId,
address_name: td.form.address_name,
address: td.form.address,
city: td.form.city,
rpdstatus: 1
}
],customers_contacts: [
{
id: contactId,
cid: customerId,
firstname: td.form.firstname,
lastname: td.form.lastname,
main_address: addressId,
rpdstatus: 1
}
]
}
};dm.ask4(
td.root,
'base',
'rapid',
'up_tdata',
'POST',
request,
{ t: 'Bearer', v: td.root.authorized },
function (error, data) {
if (error || !data) {
td.errorMessage =
'The customer transaction could not be completed.';
return;
}td.$parent.fetchData(true);
}
);
}rpdstatus values:
-1
Delete.
0
No operation.1
Create.2
Update.3
Increment a numeric field.5.16. File attachments
16.1 File-list component
------------------------
The CRM module uses the global file-list component.
Route data:
filesSettings: {
baseFolder: 'customersfiles',
foldermodel: 'ymd',
filesList: [],
filelistid: 'customer-files',
route: 'customer-file',
document_id: false,
documenttable: 'customers'
}
Use it in HTML:
<file-list
:root="parent"
:settings="filesSettings">
</file-list>
Before loading files:
this.filesSettings.document_id = this.tab.data.record.id;16.2 Loading file metadata
--------------------------
const documentId = encodeURIComponent(
this.filesSettings.document_id
);
const endpoint =
'rpdquery?csql=fileslist' +
'&did=' + documentId +
'&limit=100' +
'&offset=0';The database stores file metadata and references. The file binary should
remain in S3 rather than in PostgreSQL.
16.3 File security
------------------
The frontend must not be treated as proof of file access. The backend must:
- validate the JWT;
- verify document access;
- validate the file identifier;
- reject path traversal;
- restrict file size;
- use safe download headers.
5.17. XLSX import
A common import process is:
1. User selects an .xlsx file.
2. FileReader reads the file.
3. The browser sends the file to a protected backend endpoint.
4. The backend parses it.
5. The frontend validates headers and values.
6. Valid rows are added to the editable document.
7. The document is saved using a transaction.
Prefer a Vue change handler:
<input
type="file"
accept=".xlsx"
@change="readXlsxFile"
>
JavaScript outline:
readXlsxFile(event) {
const td = this;
const file = event.target.files[0];
if (!file) {
return;
}const maxSize = 5 * 1024 * 1024;if (file.size > maxSize) {
td.importMessage = 'The selected file is too large.';
return;
}const reader = new FileReader();reader.onload = function (loadEvent) {
const bytes = new Uint8Array(loadEvent.target.result);
let binary = '';for (const byte of bytes) {
binary += String.fromCharCode(byte);
}const base64 = btoa(binary);td.parent.datamethod.ask4(
td.parent,
'server',
'extra',
'readxlsxfile',
'POST',
{ xlsxfile: base64 },
{ t: 'Bearer', v: td.parent.authorized },
function (error, data) {
if (error || !Array.isArray(data)) {
td.importMessage = 'The file could not be read.';
return;
}td.processImportedRows(data);
}
);
};reader.readAsArrayBuffer(file);
}For large files, multipart upload is preferable to Base64 because Base64
increases payload size and browser memory use.
5.18. Validation and error handling
Frontend validation improves usability but does not provide security.
Validate on the frontend:
- required fields;
- visible formats;
- numeric ranges;
- dates;
- selected references;
- upload size;
- duplicate button presses.
Validate again on the backend:
- authorization;
- roles;
- organization ownership;
- database constraints;
- request types;
- allowed fields;
- file paths;
- external URLs.
Recommended save pattern:
if (this.saving) {
return;
}
this.saving = true;Always reset the flag in success and error paths.
Do not close a modal before receiving a successful response. Otherwise the
user can lose entered data when a request fails.
6. Backend APIs and programming
Document purpose
----------------
This document describes the server APIs used by JSAPP.CLOUD applications:
- authorization and user administration;
- PostgreSQL RAPID CRUD and query access;
- batch and transactional writes;
- RAPID before and after rules;
- S3 file management;
- custom application APIs;
- third-party service integration.
Examples use placeholder hostnames and credentials. Never place production
passwords, private keys, JWTs, AWS credentials, or third-party API keys in
documentation or frontend source code.
6.1. Backend architecture
JSAPP.CLOUD backend services are Node.js applications using REST-style,
sessionless requests.
The backend normally includes:
- application web server;
- authorization service;
- user and group administration;
- PostgreSQL RAPID API;
- RAPID administration interface;
- encrypted S3 file services;
- custom application API endpoints;
- settings and management interfaces.
Common installation ports are:
80
HTTP redirect to HTTPS.
443
Main application server and application APIs.3200
Application settings.3220
Authorization management service/interface.3330
PostgreSQL RAPID API.3400
PostgreSQL RAPID administration.Ports can be changed by installation settings or hidden behind a load
balancer or reverse proxy.
Management ports should not normally be publicly available to all IP
addresses. Restrict them by security group, firewall, VPN, or trusted
administrator addresses.
6.2. Common security model
Protected requests use:
Authorization: Bearer <JWT>JSON requests normally use:
Content-Type: application/json; charset=utf-8The services are sessionless. Every protected request must contain a
valid authorization token.
The backend must verify:
- JWT signature;
- JWT expiration;
- required user information;
- group and role access;
- route, query, or table rights;
- organization or tenant ownership where applicable.
A frontend menu being hidden does not prevent a manually created HTTP
request. Security must be enforced by the backend.
6.3. Authorization API
3.1 Login
---------
Request:
Method:
GET
URL:
https://<authorization-server>/users/loginHeaders:
Content-Type: application/json; charset=utf-8
Authorization: Basic <base64(username:password)>JavaScript example:
const credentials = btoa(username + ':' + password);fetch('https://app.example.com/users/login', {
method: 'GET',
headers: {
'Content-Type': 'application/json; charset=utf-8',
'Authorization': 'Basic ' + credentials
}
})
.then(function (response) {
if (!response.ok) {
throw new Error('Login failed');
}return response.json();
})
.then(function (data) {
if (data.login === 'OK' && data.token) {
console.log('Login succeeded');
}
});Expected response:
{
"login": "OK",
"token": "<JWT>"
}
Passwords must only be sent through HTTPS.
3.2 Update the current user
---------------------------
Request:
POST /admin/updatemeHeaders:
Authorization: Bearer <JWT>
Content-Type: application/json; charset=utf-8
Body:
{
"f": "John",
"l": "Smith",
"pwc": "<new password>"
}
Expected response:
{
"token": "<new JWT>"
}
If the response contains a new JWT, replace the old token.
3.3 Obtain administrator credential
-----------------------------------
Administrator user-management requests require an additional credential.
Request:
POST /admin/admloginHeaders:
Authorization: Bearer <administrator JWT>
Content-Type: application/json; charset=utf-8
Body:
{}Response:
{
"token": "<administrator credential>"
}
Do not persist or log this credential longer than required.
3.4 Create a user
-----------------
Request:
POST /admin/createuserHeaders:
Authorization: Bearer <administrator credential>
Content-Type: application/json; charset=utf-8
Body:
{
"user": "john.smith",
"firstname": "John",
"lastname": "Smith",
"pwc": "<initial password>"
}
3.5 Update a user
-----------------
Request:
POST /admin/updateuserBody:
{
"uid": "<user ID>",
"user": "john.smith",
"update": {
"f": "John",
"l": "Smith",
"newpwt": "<new password>"
}
}
Only fields that need to change should be sent.
3.6 List users
--------------
Request:
POST /admin/getusersBody:
{
"nro": 100,
"lastfrom": 0
}
"lastfrom" is optional and supports paging.
3.7 Find a user
---------------
Request:
POST /admin/finduserBody:
{
"user": "john.smith"
}
3.8 User-system information
---------------------------
Request:
POST /admin/usersinfoBody:
{}3.9 Create a group
------------------
Request:
POST /admin/creategroupBody:
{
"g": "sales"
}
3.10 Save group membership
--------------------------
Request:
POST /admin/savegroupBody:
{
"id": "<group ID>",
"u": {
"id": "<user ID>",
"u": "john.smith"
}
}
3.11 List groups
----------------
Request:
POST /admin/getgroupsBody:
{
"nro": 1000
}
The exact response wrappers can differ between releases. Check the Users
module installed with the same backend release.
6.4. PostgreSQL RAPID API
4.1 API purpose
---------------
RAPID provides managed PostgreSQL access and supports:
- CREATE;
- READ;
- UPDATE;
- DELETE;
- registered SQL queries;
- batch operations;
- transactional batch operations;
- numeric field increments;
- before rules;
- after rules;
- role-controlled access.
The API does not accept arbitrary client SQL. Queries must be registered
server-side through the RAPID administration interface.
4.2 Common addresses
--------------------
API:
https://<domain>:3330/rapid/Administration:
https://<domain>:3400/Actual ports depend on installation settings.
6.5. RAPID CRUD operations
5.1 CREATE
----------
Request:
POST /rapid/<table>Body:
One JSON record.Example:
POST /rapid/products{
"id": "572e88f9-483d-45ae-aef7-e31a364f5c5d",
"product_name": "Product A",
"product_code": "A-001",
"price": 10.50,
"isactive": true
}curl example:
curl -X POST \
"https://app.example.com:3330/rapid/products" \
-H "Authorization: Bearer <JWT>" \
-H "Content-Type: application/json; charset=utf-8" \
-d '{
"id":"572e88f9-483d-45ae-aef7-e31a364f5c5d",
"product_name":"Product A",
"product_code":"A-001",
"price":10.50,
"isactive":true
}'
RAPID checks fields against imported table metadata. Depending on table
metadata and release, it can generate a UUID primary key if one is not
provided.
5.2 READ BY PRIMARY KEY
-----------------------
Request:
GET /rapid/<table>?<primary-key>=<value>Example:
GET /rapid/products?id=572e88f9-483d-45ae-aef7-e31a364f5c5dWithout a primary-key parameter, the API can return a limited unsorted
table list. Use a registered query for application lists.
5.3 UPDATE
----------
Request:
PUT /rapid/<table>Body:
Primary key and changed fields.Example:
PUT /rapid/products{
"id": "572e88f9-483d-45ae-aef7-e31a364f5c5d",
"price": 12.75,
"isactive": true
}5.4 DELETE
----------
Request:
DELETE /rapid/<table>?<primary-key>=<value>Example:
DELETE /rapid/products?id=572e88f9-483d-45ae-aef7-e31a364f5c5dIf a table uses a boolean field named "deleted", the configured API can
use soft deletion. Registered queries must then exclude deleted records.
6.6. Registered SQL queries
6.1 Why registered queries are used
-----------------------------------
Sending arbitrary SQL from the browser would create a serious security
risk. RAPID stores SQL statements on the server and exposes them by name.
Queries are created and tested in:
https://<domain>:3400/6.2 Query parameters
--------------------
RAPID SQL uses "&" to mark named parameters.
Registered SQL:
select *
from customers_addresses
where customer_id = &cid
order by address_name
Request:
GET /rapid/rpdquery
?csql=customeraddresses
&cid=<customer ID>
&limit=100
&offset=0
Place spaces around parameters where required by the RAPID parser:
where customer_id = &cidAvoid forms such as:
where customer_id=(&cid)6.3 Pagination
--------------
Query requests require:
limit
Maximum records returned.
offset
Records skipped.Example:
/rapid/rpdquery?csql=products&limit=50&offset=0Historically, limit=0 can select a configured default, commonly 1000
records. It does not necessarily mean unlimited.
6.4 Query response
------------------
The returned array is generally named after the query.
Request:
csql=productsTypical response:
{
"products": [
{
"id": "...",
"product_name": "Product A"
}
]
}
6.5 IN list parameter
---------------------
The documented special parameter name for an IN list is:
rapid_listRegistered SQL:
select *
from products
where id in ( &rapid_list )
Use only according to the installed RAPID release and validate the
accepted list format.
6.6 Query design recommendations
--------------------------------
- Select only required columns.
- Use deterministic ORDER BY clauses.
- Apply organization or tenant filters.
- Use practical limits.
- Add database indexes for filters and joins.
- Do not expose sensitive fields without need.
- Avoid select * for stable production APIs.
- Use database constraints for uniqueness.
- Give each query only to roles that require it.
6.7. Batch operations
7.1 Endpoints
-------------
Non-transactional:
POST /rapid/up_dataTransactional:
POST /rapid/up_tdata7.2 Request structure
---------------------
The body contains a "data" object. Each key is a table, and its value is
an array of records.
Example:
{
"data": {
"customers": [
{
"id": "<customer ID>",
"company": "Example Company",
"main_address": "<address ID>",
"main_contact": "<contact ID>",
"rpdstatus": 1
}
],
"customers_addresses": [
{
"id": "<address ID>",
"customer_id": "<customer ID>",
"address": "Example Street 1",
"city": "Example City",
"rpdstatus": 1
}
]
}
}7.3 Status values
-----------------
rpdstatus = -1
Delete.
rpdstatus = 0
No operation.rpdstatus = 1
Create.rpdstatus = 2
Update.rpdstatus = 3
Increment a numeric field.7.4 Increment operation
-----------------------
Example:
{
"data": {
"autonumbers": [
{
"id": "DEFAULTORDER",
"sign": "+",
"increment": 1,
"field": "nro",
"rpdstatus": 3
}
]
}
}
7.5 Transaction behavior
------------------------
Use up_tdata when all writes belong to one logical business operation.
Examples:
- invoice header and invoice lines;
- customer, first address, and first contact;
- order and order products;
- document update and audit record.
If any operation fails, the transaction is rolled back.
For up_data, records are processed independently. Historical responses set
successful records to rpdstatus 0 and failed records to rpdstatus 9 with
additional error information.
7.6 Order-number allocation
---------------------------
The CRM demo performs:
1. Increment the autonumber.
2. Query the value.
3. Create the order.
Under concurrency, this should ideally be one atomic server-side operation.
A safer PostgreSQL pattern is:
update autonumbers
set nro = nro + 1
where id = $1
returning prefix, nro
If RAPID cannot expose the incremented value in the same response, create
a protected custom backend operation or database function that allocates
and returns the number atomically.
6.8. RAPID before and after rules
8.1 Purpose
-----------
Before rules run before CRUD operations and can:
- validate values;
- reject a request;
- set audit fields;
- derive user information from the JWT;
- apply organization values;
- protect fields from modification.
After rules run after the operation and can:
- remove protected fields;
- transform the response;
- add controlled result information.
8.2 Naming
----------
Table-specific rule names combine the lowercase table name and action:
productsCreate
productsFind
productsUpdate
productsDelete
8.3 Before-rule sample
----------------------
module.exports = {
productsCreate: function (req, atr, next) {
if (!atr.product_name) {
return next({
error: 'Product name is required.'
});
}
atr.user = req.token.user;
atr.createdAt = new Date();return next();
}
};Parameters:
req
Express request. The validated JWT is normally available through
req.token.
atr
Body or query attributes.next
Callback that must be called.Continue:
next();Reject:
next({ error: 'Request rejected.' });8.4 Global checkAll rule
------------------------
Example:
checkAll: function (req, atr, next) {
if (!req.token || !req.token.user) {
return next({
error: 'Authorization is required.'
});
}
return next();
}Token expiration should normally be checked by JWT verification
middleware. If a custom claim is checked, compare compatible timestamp
values.
8.5 Rule security
-----------------
Do not trust these values when supplied by the browser:
- username;
- user ID;
- organization ID;
- role;
- group;
- audit date;
- protected status.
Resolve them from the validated JWT or server configurationn where
possible.
6.9. S3 Drive API
The drive service uses a private S3 bucket and adds user and folder
structures required by JSAPP.CLOUD.
All protected operations require a JWT.
9.1 Default folders
-------------------
Request:
POST /sfd/defaultsBody:
{}The endpoint initializes a new user's drive when necessary.
Example response:
{
"apps": true,
"fixed": true,
"fldname": "Root",
"folders": [
{
"fldname": "Documents",
"id": "Documents"
},
{
"fldname": "Files",
"id": "Files"
},
{
"fldname": "Trash",
"id": "Trash"
},
{
"fldname": "Applications",
"id": "Applications"
}
],
"id": "Root",
"parentid": "Root",
"ownerid": "<owner ID>"
}9.2 Create a folder
-------------------
POST /sfd/createfolderBody:
{
"folder": "Contracts",
"parentid": "Documents"
}9.3 Delete a folder
-------------------
POST /sfd/deletefolderBody:
{
"folderid": "Documents/Contracts/Old"
}Check for required files and subfolders before deleting. Fixed default
folders cannot normally be deleted.
9.4 Folder information
----------------------
POST /sfd/folderdataBody:
{
"id": "Documents/Contracts"
}9.5 Folder files
----------------
The supplied documentation uses:
POST /upload/s3enc/sfd/folderfilesBody:
{
"id": "Documents/Contracts"
}Verify this path against the installed Web Drive module because some
releases can expose it under a different route.
9.6 Copy files
--------------
POST /sfd/copyfilesBody:
{
"files": [
{
"id": "contract.pdf",
"ext": "pdf",
"parentid": "Documents/Contracts",
"preext": "contract"
}
],
"folderid": "Files/Archive"
}9.7 Move files to Trash
-----------------------
POST /sfd/deletefileBody:
{
"opt": false,
"files": [
{
"id": "contract.pdf"
}
],
"folderid": "Documents/Contracts"
}9.8 Upload a file
-----------------
The documented legacy endpoint is:
POST /upload/s3enc/<encoded-folder-id>?token=<JWT>The request is multipart/form-data and the file field is:
s3encThe folder encoding replaces "/" with "*" and URI-encodes the result.
Prefer an Authorization header instead of a token in the URL when the
installed release supports it. URL tokens can appear in logs, browser
history, and proxy records.
9.9 Download a file
-------------------
The documented legacy endpoint is:
GET /simple/getfile/<encoded-file-info>?token=<JWT>The historical encoding replaces "/" with "*".
Example file information:
Applications*folder*new*info.txtThe server returns download headers that cause the browser to save or open
the file.
Again, an Authorization header is preferable where supported.
6.10. Business-document attachments
Application attachments differ from a user's normal Web Drive files.
A database metadata record can contain:
- id;
- document_id;
- document_table;
- filename;
- filepath;
- content type;
- size;
- createdAt;
- user;
- working or deleted state.
The backend must not grant access solely because the browser knows a path.
Required checks:
1. Validate the JWT.
2. Load the file metadata by a controlled identifier.
3. Verify access to the related business document.
4. Construct the S3 key on the server.
5. Reject path traversal and unsupported base folders.
6. Set a safe Content-Disposition filename.
7. Log the operation without logging the JWT.
Base64 encoding of a filename or path is not security.
6.11. Custom backend programming
11.1 Purpose
------------
Custom APIs are appropriate for:
- third-party REST integrations;
- AI integrations;
- SFTP or FTP connectors;
- legacy SOAP services;
- XLSX processing;
- email delivery;
- custom document operations;
- protected business calculations;
- atomic database operations not directly provided by RAPID.
11.2 Location and registration
------------------------------
The supplied application refers to an extra.js custom API extension.
The exact path and export structure are release-specific. Before adding an
endpoint:
1. Locate the existing extra.js used by the installed application server.
2. Copy the structure of a working endpoint.
3. Confirm how the endpoint is registered.
4. Confirm that JWT middleware runs before it.
5. Back up the original file.
6. Check syntax before restarting the service.
7. Test using a non-production installation.
11.3 Recommended endpoint structure
-----------------------------------
Conceptual example:
customAction: async function (req, res) {
try {
const value = String(req.body.value || '').trim();if (!value) {
return res.status(400).send({
ok: false,
error: {
code: 'VALUE_REQUIRED',
message: 'value is required'
}
});
}if (!req.token || !req.token.user) {
return res.status(401).send({
ok: false,
error: {
code: 'UNAUTHORIZED',
message: 'Authorization is required'
}
});
}const result = await doProtectedWork(value, req.token);return res.send({
ok: true,
data: result
});
} catch (error) {
console.error('customAction failed:', error.message);return res.status(500).send({
ok: false,
error: {
code: 'SERVER_ERROR',
message: 'The request could not be completed.'
}
});
}
}11.4 Status codes
-----------------
Recommended codes:
200
Successful read or update.201
Resource created.400
Invalid request.401
Missing or invalid authentication.403
Authenticated but not authorized.404
Resource not found.409
Conflict or duplicate.413
Request or upload too large.429
Rate limit exceeded.500
Unexpected server error.502 or 504
Third-party service failure or timeout.Existing platform endpoints may use legacy response conventions. New
endpoints should use consistent status codes where compatible with ask4.
11.5 Required checks
--------------------
Every custom endpoint should:
- require HTTPS;
- validate JWT authorization;
- verify roles or groups;
- validate required fields;
- reject unexpected fields where practical;
- limit body and upload size;
- use parameterized SQL;
- use safe file paths;
- set external request timeouts;
- handle rejected promises;
- avoid multiple res.send calls;
- return generic production errors;
- avoid logging secrets;
- apply rate limits to expensive operations.
6.12. Third-party API integration
Recommended flow:
Browser
-> JSAPP.CLOUD custom API with JWT
-> role and parameter validation
-> third-party API with server-side credential
-> normalized response
-> browserDo not call a credential-protected third-party API directly from the
browser.
Backend controls should include:
- target-host allowlist;
- connection and response timeout;
- response-size limit;
- restricted redirects;
- retry only for safe operations;
- rate and cost limits;
- normalized error responses;
- protection against server-side request forgery.
6.13. AI service integration
AI services should use the same backend-proxy pattern.
Before sending data to an external AI provider:
- remove unnecessary personal data;
- remove credentials and access tokens;
- remove confidential financial or medical data unless approved;
- verify the provider's data-retention terms;
- restrict allowed models;
- limit prompt and output sizes;
- apply per-user rate and cost limits;
- treat generated output as untrusted text;
- never automatically execute generated code.
Conceptual endpoint:
aiPrompt: async function (req, res) {
try {
const prompt = String(req.body.prompt || '').trim();if (!prompt) {
return res.status(400).send({
ok: false,
error: {
code: 'PROMPT_REQUIRED',
message: 'A prompt is required.'
}
});
}if (prompt.length > 10000) {
return res.status(413).send({
ok: false,
error: {
code: 'PROMPT_TOO_LARGE',
message: 'The prompt is too large.'
}
});
}const result = await callConfiguredAiProvider({
prompt: prompt,
user: req.token.user,
timeout: 30000
});return res.send({
ok: true,
data: {
text: result.text
}
});
} catch (error) {
console.error('AI request failed:', error.message);return res.status(502).send({
ok: false,
error: {
code: 'AI_PROVIDER_ERROR',
message: 'The AI service could not complete the request.'
}
});
}
}6.14. Server-side database programming
Custom APIs must use parameterized SQL.
Unsafe:
const sql =
"select * from customers where id = '" +
req.body.id +
"'";Safe PostgreSQL pattern:
const sql =
'select * from customers where id = $1';const values = [
req.body.id
];Use:
- a restricted database user;
- transactions for related writes;
- statement timeouts;
- practical result limits;
- unique and foreign-key constraints;
- organization filters;
- server-derived audit fields.
6.15. Multi-organization security
The browser's selectedORG value is user interface state, not proof that a
user has access to an organization.
For tenant-aware operations:
- resolve permitted organizations from the validated JWT or server data;
- validate the requestd organization;
- include the organization in every relevant query;
- set organization fields in before rules;
- verify ownership before update and delete;
- test cross-organization access attempts.
7. Third party integration
The system offers the possibility to extend its API base.
Connecting to modern REST third-party APIs is easy; on the other hand, you can create your own API connector to almost any legacy third- party application via a custom API.
Sample: (FTP/SFTP)
- A third party offers information in an SFTP folder.
- Add a custom API that holds the credentials, connects to the SFTP folder and do whatever is necessary.
- Your client app will securely connect to the custom API as with any other.
There are legacy apps that still use FTP/SFTP, DCOM or SOAP for interoperability.
Implement custom APIs as easy as possible or just create an API connector to existing API brokers.
8. AI
Integrating AI services is as easy as integrating any other third-party REST APIs. The AI interfaces are new and generally use a REST API as the default standard.
The business logic of your application module can be as complex as you envision. Third-party or AI services can help you solve problems faster and also distribute your system load, helping you scale more quickly .
In order to integrate an AI service into your application you should follow next steps:
- find an AI service that suits your needs and have a standard acces point REST API and documentation
- set your API access point into the system, backend programming is required ( JS, Node.js module ),
the integration is relatively simple depending on the third party access model, the service itself will have only few lines of codes for credential parameters, the AI API request and callback or promise response;
- integrate the AI request into your application ( frontend ).
Please consider that it may not be wise to send personal data of other
people
or company financial information to public AI services like ChatGPT or any
similar service
.
If your customer needs AI services, it is recommended to use them from trusted providers or install your own AI server using smaller-sized models . Most smaller models will handle financial information, data prediction , or text-based generation well.
9 Roadmap
We will continue to maintain and develop new features for this web application development model.
New features will be added according to the development strategy and partners' requests.
Under development tools refers to AI integration.
While AI has recently been introduced into the market, it has proved its power.
Although AI interfaces can be easily used in your modules, we will soon add an AI-assisted module construction wizard
to the CLOUD IDE to help you start a new module faster .
10 Technical support
The solution implementation may require IT and Amazon AWS knowledge.
As a software application solution that requires installation and implementation on
the CLOUD provider infrastructure with different scenarios under a final client account,
technical support may be subject to the implementation contract with an software integrator.
Please check the solution presentation web page for more details.
Basic technical support is offered by email to a system administrator in case there
is no integrator that provides technical support or maintenance (jsapp@qbis.com).
Depending on the complexity of requests, there may be additional fees per intervention if there is no help desk contract agreement.
The fee levels relate to the complexity and confidentiality agreements required for the operation.
The ticketing help desk will be commercially available in short time.
11. License
THIS COMMERCIAL LICENSE AGREEMENT (“AGREEMENT”) IS A LEGALLY BINDING
CONTRACT BETWEEN THE INDIVIDUAL WHO INSTALL THE SOFTWARE (“YOU”) AND
THE LICENSOR, THAT SHOULD BE READ IN ITS ENTIRETY. THIS IS AN AGREEMENT
GOVERNING YOUR USE OF FREE SOFTWARE, FURTHER DEFINED HEREIN AS
“SOFTWARE SOLUTION”, AND THE LICENSOR OF THE SOFTWAREIS WILLING TO
PROVIDE YOU WITH ACCESS TO THE SOLUTION ONLY ON THE CONDITION THAT
YOU ACCEPT ALL OF THE TERMS AND CONDITIONS CONTAINED IN THIS
AGREEMENT. YOU ARE DEEMED TO HAVE READ, UNDERSTOOD AND ACCEPTED ALL
SUCH TERMS AND CONDITIONS UPON IMPLEMENTING THE SOLUTION.THIS
COMMERCIAL SOFTWARE SOLUTION IS COPYRIGHTED AND THE OWNER OF THE
COPYRIGHT CLAIMS ALL EXCLUSIVE RIGHTS TO SUCH SOFTWARE, EXCEPT AS
LICENSED TO USERS HEREUNDER AND SUBJECT TO STRICT COMPLIANCE WITH THE
TERMS OF THIS AGREEMENT. IF YOU FAIL TO ABIDE BY ANY OF THE TERMS AND
CONDITIONS SET FORTH HEREIN, YOUR LICENSE TO USE SUCH COMMERCIAL
SOFTWARE SOLUTION SHALL BE IMMEDIATELY AND AUTOMATICALLY REVOKED,
WITHOUT ANY NOTICE OR OTHER ACTION BY THE LICENSOR.
Software: jsapp ( https://www.jsapp.cloud )
License type: Commercial
Licensor: Q-Bis Consult S.R.L. ( www.qbis.ro )
1. Description:
The JSApp implementation utilizes various services to address all requests (the software solution).
The software solution employs cloud and infrastructure services from Amazon AWS to provide easily usable services for remote work ; it focuses on security and scalability by offering simple web interfaces and integration with third-party solutions based on open standards. Please visit the presentation website for more details.
The copyright owner of the software solution applications is Q-Bis Consult SRL (the provider or the licensor).
Open standards and open source were used to construct the applications and services; however,
the software solution's copyright owner is Q-Bis Consult SRL, with exceptions granted to external resources.
2. Usage:
The software comes pre-installed in Amazon EC2 AMIs found in the AWS Marketplace.
The server applications (services) can only be installed as specified by the provider using Amazon AWS AMIs
from the AWS Marketplace in accordance with the recommended AMI types (see the installation guide here: https://www.jsapp.cloud/services.html).
Files found in the subsequent sub-folders and recurring folders are under Q-Bis Consult copyright:
- auth
- memorydb
- web80
- webapp
- settings
- psql
You cannot copy or move the software solution to other server instances (AWS EC2 AMIs )
or to other computers outside of Amazon AWS. You may modify existing files to enhance or expand functionality; however,
you cannot distribute, move, or copy the modified software solution to another server without approval from the software solution provider.
The following frontend application modules delivered with the solution can be used only with
the original backend that operates on the previously described Amazon AWS AMIs:
- the webapp base
- the web drive application
- the web reports application
3. Trial:
A 15-day trial period is offered for software services; the AWS infrastructure cost is not included in the trial period.
4. Fees:
The software comes pre-installed in Amazon EC2 AMIs found in the AWS Marketplace.
Software service fees are included in the price of the VPCs rented from AWS.
The AWS list price for the EC2 AMI details the cost for AWS infrastructure and the price for software. Prices are charged per hour.
5. Disclaimer:
The software solutions used are tested and have been in use since 2014.
Due to the significant difference between the cost of the solution and the value of the stored data,
the software for the server services and web application is delivered "as is" without any warranty of any kind; Q-bis Consult SRL,
the provider, cannot be held liable for any data loss that may occur while using the software for any reason .
In the event that local law establishes that compensation is required, the compensation cannot exceed the value of the paid service for the software for one month,
but it will not exceed 50 USD .
6. Technical support :
Implementing the solution may require IT and Amazon AWS knowledge;
please check the solution presentation web page (https://www.jsapp.cloud/services.html)
for a solution integrator who can assist with implementation and customization.
Basic technical support is offered by email to a system administrator
in cases where there is no integrator providing technical support or maintenance (jsapp@qbis.ro).
Depending on the complexity of the requests, there may be additional fees per intervention when no maintenance contract is in place .
The fee level is related to the complexity and confidentiality agreements required for the operation; however, it does not exceed fees accepted in the IT industry.
As a software application solution that requires installation and implementation
with the CLOUD provider under a final client account, technical support may be subject to the implementation contract with an integrator.
Q-bis Consult provides a list of software integrators on the product presentation web pages.